Dymo LabelManager 500 Touch Screen Label Maker User Guide 1 - Page 9
Inserting Special Characters, Auto-Text, and Barcodes
 |
View all Dymo LabelManager 500 Touch Screen Label Maker manuals
Add to My Manuals
Save this manual to your list of manuals |
Page 9 highlights
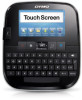
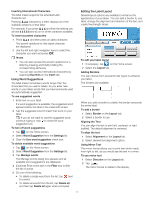
Changing the Font Type You can change the font type for some or all of the text on your label. To change the font type 1 If necessary, select the existing text to change. To change the font type for new text only, you do not need to select any existing text. 2 Select the desired font type from the font type list. Changing the Font Size The font sizes available depend on the label width selected. To change the font size 1 If necessary, select the existing text to change. To change the style for new text only, you do not need to select any existing text. 2 Select the desired font size from the font size list. Changing the Font Style Five font styles are available for your labels: bold, italic, underline, strikethrough, and outline. All styles can be combined. To change the font style 1 If necessary, select the existing text to change. To change the style for new text only, you do not need to select any existing text. 2 Tap the button for each desired style. Inserting Special Characters, Auto-Text, and Barcodes From the Insert tab, you can quickly add symbols, clip art, barcodes, several types of auto-text, and international characters. Recently used clip art and symbols are automatically added to the Favorites category. Favorites is located at the top of the Insert list. To access the insert tab 1 If necessary, tap on the Home screen. 2 Select the Insert tab. Inserting Symbols The label maker supports a variety of useful symbols that you can quickly add to your labels. To insert a symbol 1 Select Symbols on the Insert tab. 2 Select the symbol to insert on your label. You can quickly access the punctuation symbols by pressing or the currency symbols by pressing on the keypad. Inserting Clip Art The label maker includes a variety of clip art images for use on your labels. You can also download your own custom clip art to the label maker. See Using the Label Maker with Your Computer on page 16 for information about downloading clip art. To insert clip art 1 Select Clip Art on the Insert tab. 2 Select the image to insert on your label. A label can only contain one clip art image. Using Auto-Numbering You can print a series of up to 50 labels at a time using auto-numbering. To use auto-numbering 1 Select Auto-fields and Barcodes on the Insert tab. 2 Tap Numbering. The Insert Numbering dialog box appears. 3 Select the numbering style to use. 4 Select the start value for the auto-numbering. 5 Select the amount to increment each label. 6 Select the number of labels to create. 7 Optionally, select the Add leading zeros check box to include leading zeros before numbers. 8 Tap OK. The auto-number field is inserted on the label. The auto-number field is treated as a single character on the label. You can delete this field just as you would any other character. See Printing a Series of Labels on page 13 for information about printing labels with auto-numbering. Inserting the Date and Time You can insert the current date and time on your label. Before inserting the date and time, you must set the current date and time in the label maker settings To set the date 1 Tap on the Home screen. 2 Select Date from the settings list. 3 Select the current year, month, and day. 4 Select the desired date format, and then tap Done. 9
-
 1
1 -
2
-
3
-
 4
4 -
 5
5 -
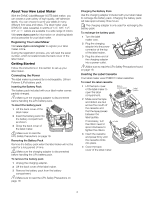 6
6 -
 7
7 -
 8
8 -
 9
9 -
 10
10 -
 11
11 -
 12
12 -
 13
13 -
 14
14 -
15
-
16
-
17
-
18
-
19
 |
 |