Dynex DX-40L261A12 User Manual (English) - Page 10
Remote control - screen
 |
View all Dynex DX-40L261A12 manuals
Add to My Manuals
Save this manual to your list of manuals |
Page 10 highlights
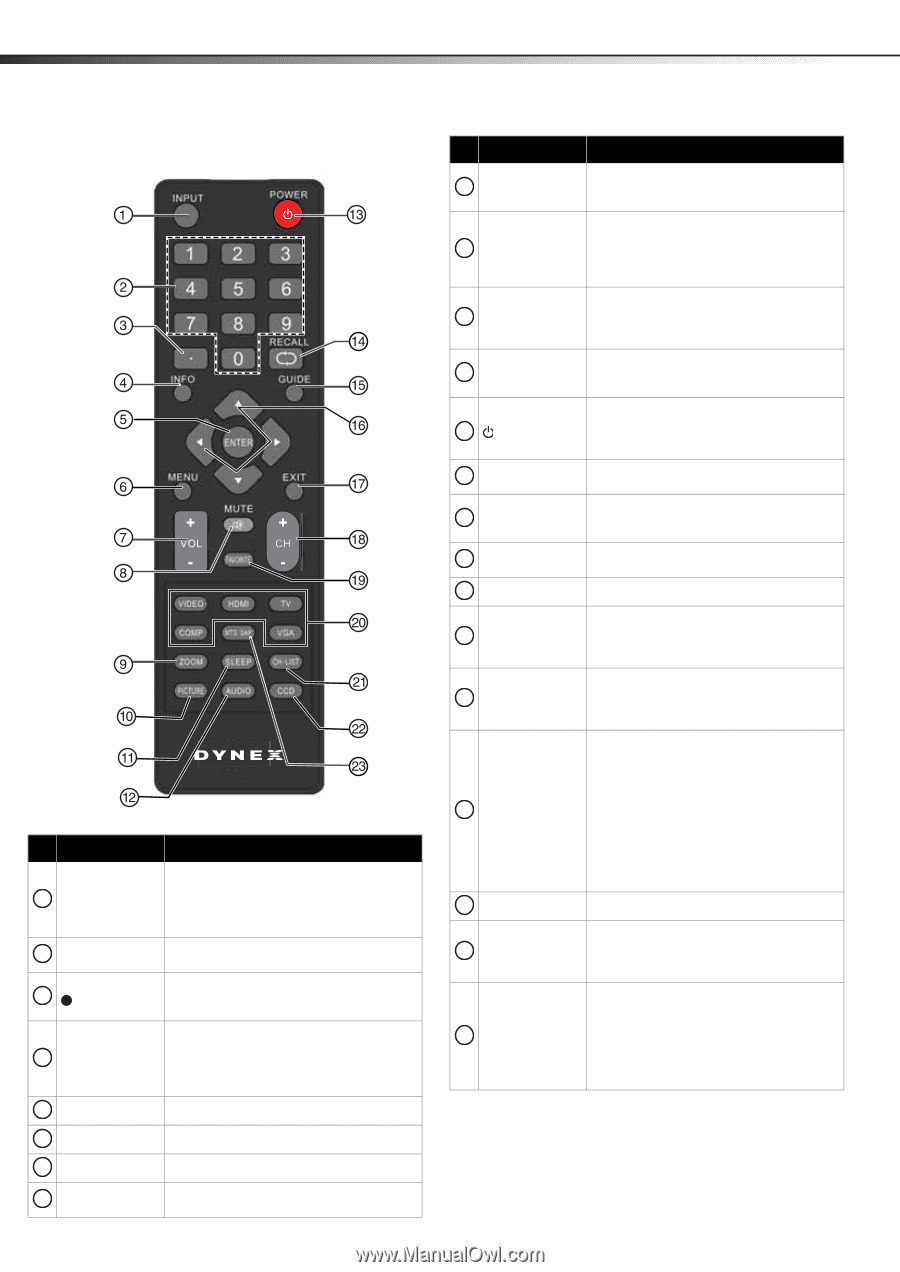
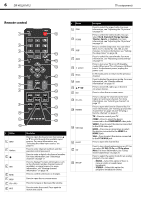
6 DX-40L261A12 TV components Remote control # Button 9 ZOOM 10 PICTURE 11 SLEEP 12 AUDIO 13 (power) 14 RECALL 15 GUIDE 16 17 EXIT 18 CH +/CH- 19 FAVORITE # Button 1 INPUT 2 Numbers 3 4 INFO 5 ENTER 6 MENU 7 VOL +/VOL - 8 MUTE Description Press to open the Source List, then press or to cycle through the available input sources. For more information, see "Selecting the video input source" on page 16. Press to enter channel numbers and the parental control password. Press to enter a digital sub-channel number. For more information, see "Selecting a channel" on page 17. Press to display TV status information, such as the channel number, channel name (if available), or signal source. For more information, see "Viewing channel information" on page 18. Press to confirm selections or changes. Press to open the on-screen menu. Press to increase or decrease the volume. Press to mute the sound. Press again to restore the sound. 20 Video input 21 CH-LIST 22 CCD 23 MTS/SAP Description Press to select the aspect ratio. For more information, see "Adjusting the TV picture" on page 18. Press to select the video modes. You can select Vivid, Standard, Energy Savings, Theater, Sports, or Custom. For more information, see "Adjusting the TV picture" on page 18. Press to set the sleep timer. You can select Off, 5, 10, 15, 30, 60, 90, 120, 180, or 240 minutes. For more information, see "Setting the sleep timer" on page 28. Press to select the sound mode. For more information, see "Adjusting sound settings" on page 19. Press to turn your TV on or off (Standby mode). When your TV is off, power still flows into it. To disconnect power, unplug the power cord. In TV mode, press to return to the previous channel. Press to display the program guide. For more information, see "Viewing channel information" on page 18. Press to move left, right, up, or down in on-screen menus. Press to close the on-screen menu. Press to change TV channels to the next higher or next lower channel. For more information, see "Selecting a channel" on page 17. Press to open the Favorite Channel list. For more information, see "Setting up a favorite channel list" on page 20 and "Viewing a favorite channel" on page 21. TV-Press to control your TV. COMP-Press to select the device connected to the COMPONENT video jacks. VIDEO--Press to select the device connected to the AV IN video jack. HDMI-Press one or more times to select the device connected to the HDMI 1 or HDMI 2 jack. VGA-Press to select the device connected to the PC IN VGA jack. Press to open the channel list. Press to turn closed captioning on or off. You can select CC Off, CC On, or CC On when Mute. For more information, see "Using closed captioning" on page 25. Press to select the audio mode for an analog program. You can select: • MONO-Select this option if there is noise or static on weak stereo broadcasts. • STEREO-Select this option for programs broadcast in stereo.
-
 1
1 -
2
-
3
-
4
-
 5
5 -
 6
6 -
 7
7 -
 8
8 -
 9
9 -
 10
10 -
 11
11 -
 12
12 -
 13
13 -
 14
14 -
 15
15 -
16
-
17
-
18
-
19
-
20
-
21
-
22
-
23
-
24
-
25
-
26
-
27
-
28
-
29
-
30
-
31
-
32
-
33
-
34
-
35
-
36
-
37
-
38
-
39
-
40
-
41
-
42
 |
 |