E-Z-GO Express S6 - Electric Owner Manual - Page 59
Light Bulb Replacement
 |
View all E-Z-GO Express S6 - Electric manuals
Add to My Manuals
Save this manual to your list of manuals |
Page 59 highlights
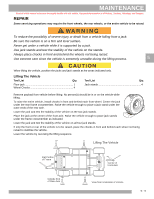
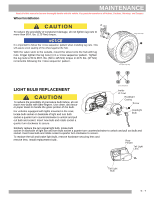
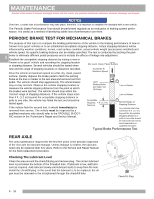
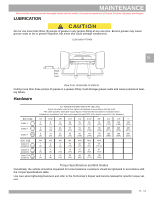
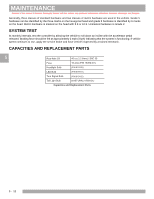
MAINTENANCE Read all of this manual to become thoroughly familiar with this vehicle. Pay particular attention to all Notices, Cautions, Warnings, and Dangers. Wheel Installation To reduce the possibility of component damage, do not tighten lug nuts to more than 85 ft. lbs. (115 Nm) torque. NOTICE It is important to follow the 'cross sequence' pattern when installing lug nuts. This will assure even seating of the wheel against the hub. With the valve stem to the outside, mount the wheel onto the hub with lug nuts. Finger tighten the lug nuts (1) in a 'cross sequence' pattern. Tighten the lug nuts to 50 to 85 ft. lbs. (68 to 115 Nm) torque in 20 ft. lbs. (27 Nm) increments following the 'cross sequence' pattern. Valve Stem Cap Tire style may vary 5 LIGHT BULB REPLACEMENT To reduce the possibility of premature bulb failure, do not touch new bulbs with bare fingers. Use clean, dry tissue or paper towel to handle the glass portion of the bulb. For vehicles equipped with lights mounted in the cowl, locate bulb socket on backside of light and turn bulb socket a quarter turn counterclockwise to unlock and pull out bulb and socket. Insert new bulb and rotate socket a quarter turn clockwise to secure. Cross Sequence Inside of Cowl Headlight Casing Screw Headlight Bulb Similarly replace the turn signal light bulb, locate bulb socket on backside of light bar and turn bulb socket a quarter turn counterclockwise to unlock and pull out bulb and socket. Insert new bulb and rotate socket a quarter turn clockwise to secure. To replace the tail and brake light bulb, remove hardware securing lens and remove lens. Install replacement bulb.. Rear FReenadrer Fender Tail Light LTeanisl Light Lens Tail Light TBaiul lLbight Bulb 5- 7
-
 1
1 -
2
-
3
-
4
-
5
-
6
-
7
-
8
-
9
-
10
-
11
-
12
-
13
-
14
-
15
-
16
-
17
-
18
-
19
-
20
-
21
-
22
-
23
-
24
-
25
-
26
-
27
-
28
-
29
-
30
-
31
-
32
-
33
-
34
-
35
-
36
-
37
-
38
-
39
-
40
-
41
-
42
-
43
-
44
-
45
-
46
-
47
-
48
-
49
-
50
-
51
-
52
-
53
-
 54
54 -
 55
55 -
 56
56 -
 57
57 -
 58
58 -
 59
59 -
 60
60 -
 61
61 -
 62
62 -
 63
63 -
 64
64 -
65
-
66
-
67
-
68
-
69
-
70
-
71
-
72
-
73
-
74
-
75
-
76
-
77
-
78
 |
 |
