E-Z-GO Freedom RXV - Gas Owner Manual - Page 38
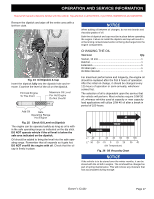
Fig. 27, Cleaning Top of Engine, Fig. 28, Remove Oil Filter, Fig. 29, Inspect Oil Filter, small, Fig
 |
View all E-Z-GO Freedom RXV - Gas manuals
Add to My Manuals
Save this manual to your list of manuals |
Page 38 highlights
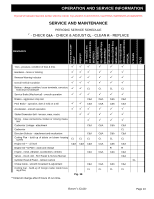
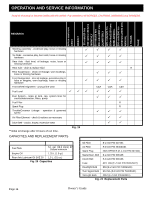
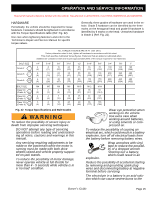
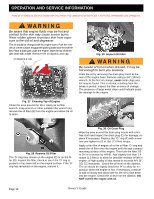
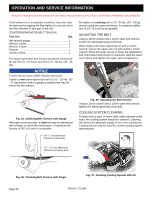
OPERATION AND SERVICE INFORMATION Read all of manual to become familiar with this vehicle. Pay attention to all NOTICES, CAUTIONS, WARNINGS and DANGERS. B Be aware that engine fluids may be hot and contact to the skin may cause severe burns. Wear rubber gloves to protect skin from exposure to the old oil and degreaser. The oil should be changed with the engine warm. Park the vehicle on a level surface, engage the parking brake and remove the key. Place a drain pan under the engine. Wipe the top of the engine clean with a cloth. Remove the oil dipstick and cap. Oil Dipstick & Cap D C Fig. 29 Inspect Oil Filter Be careful of hot oil when drained. It may be hot enough to burn you severely. Drain the oil by removing the drain plug found at the rear of the engine base. Remove using a 3/4" (19mm) wrench. At the first oil change, small metal chips and lint may be found. This is normal, resulting from the break-in period. Inspect the filter at every oil change. The presence of large metal chips could indicate possible damage to the engine. Fig. 27 Cleaning Top of Engine Clean the area around the filter. Using an oil filter wrench, strap wrench or other suitable filter wrench (A), remove the oil filter (B) from the engine and allow the oil to drain. F G Fig. 28 Remove Oil Filter The 'O'-ring may remain on the engine (C) or on the filter (D). Inspect the filter, check to see if the 'O' ring is present or has been left on the engine surface. If the 'O' ring has remained on the engine, remove it. Fig. 30 Oil Drain Plug Wipe the area around the drain plug mount with a lintfree cloth and inspect the drain plug (G) for damage; replace if necessary. Replace the "O"-ring (F) with a new one and tighten to 61 in. lbs. (7.0 Nm) torque. Apply a thin film of engine oil to the oil filter 'O'-ring and install the oil filter onto the engine until the seal contacts mounting surface of the engine. Then turn the filter 2/3 to 3/4 of a rotation by HAND. Add slightly less than 1.4 quarts (1.3 liters); to allow for possible residual oil left in engine; of high quality oil that meets or exceeds API SF, SG, CC standards. Check the oil level on the dipstick. The oil should be slightly below the 'H' to allow for expansion when the engine is hot. If necessary, continue to add oil slowly and allow time for the oil to flow down into the engine. Check the oil level on the dipstick. DO NOT overfill the engine with oil. Page 18 Owner's Guide
-
 1
1 -
2
-
3
-
4
-
5
-
6
-
7
-
8
-
9
-
10
-
11
-
12
-
13
-
14
-
15
-
16
-
17
-
18
-
19
-
20
-
21
-
22
-
23
-
24
-
25
-
26
-
27
-
28
-
29
-
30
-
31
-
32
-
 33
33 -
 34
34 -
 35
35 -
 36
36 -
 37
37 -
 38
38 -
 39
39 -
 40
40 -
 41
41 -
 42
42 -
 43
43 -
44
-
45
-
46
-
47
-
48
-
49
-
50
-
51
-
52
-
53
-
54
-
55
-
56
-
57
-
58
-
59
-
60
 |
 |
