EVGA 132-LF-E655-KR User Guide - Page 11
Installing the CPU - protection
 |
UPC - 843368011703
View all EVGA 132-LF-E655-KR manuals
Add to My Manuals
Save this manual to your list of manuals |
Page 11 highlights
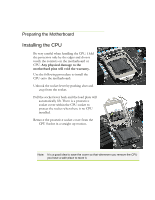
Preparing the Motherboard Installing the CPU Be very careful when handling the CPU. Hold the processor only by the edges and do not touch the contacts on the motherboard or CPU. Any physical damage to the motherbard pins will void the warranty. Use the following procedure to install the CPU onto the motherboard: Unhook the socket lever by pushing down and away from the socket. Pull the socket lever back and the load plate will automatically lift. There is a protective socket cover within the CPU socket to protect the socket when there is no CPU installed. Remove the protective socket cover from the CPU Socket in a straight up motion. Note: It is a good idea to save the cover so that whenever you remove the CPU you have a safe place to store it.
-
 1
1 -
2
-
3
-
4
-
5
-
 6
6 -
 7
7 -
 8
8 -
 9
9 -
 10
10 -
 11
11 -
 12
12 -
 13
13 -
 14
14 -
 15
15 -
 16
16 -
17
-
18
-
19
-
20
-
21
-
22
-
23
-
24
-
25
-
26
-
27
-
28
-
29
-
30
-
31
-
32
-
33
-
34
-
35
-
36
-
37
-
38
-
39
-
40
-
41
-
42
-
43
-
44
-
45
-
46
 |
 |
