Edimax AR-7084A Quick Installation Guide - Page 2
Hardware Setup
 |
View all Edimax AR-7084A manuals
Add to My Manuals
Save this manual to your list of manuals |
Page 2 highlights
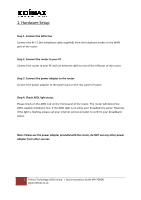
1. Hardware Setup Step 1. Connect the ADSL line Connect the RJ‐11 (the telephone cable supplied) from the telephone socket to the WAN port of the router Step 2. Connect the router to your PC Connect the router to your PC with an ethernet cable to one of the LAN port of the router. Step 3. Connect the power adapter to the router Connect the power adapter to the power jack on the rear panel of router. Step 4. Check ADSL light status Please check on the ADSL Led on the front panel of the router. The router will detect the ADSL‐capable telephone line. If the ADSL light is on solid, your broadband is active. However, if the light is flashing, please call your internet service provider to confirm your broadband status. Note: Please use the power adapter provided with the router, do NOT use any other power adapter from other sources. 2 Edimax Technology (UK) Limited | Quick Installation Guide (AR‐7084A) www.edimax.co.uk
-
 1
1 -
 2
2 -
 3
3 -
 4
4 -
 5
5 -
 6
6 -
 7
7 -
 8
8
 |
 |