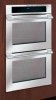
Electrolux E30EW85GPS Installation Instructions - Page 6
Cabinet Installation - ovens
 |
UPC - 057112096353
View all Electrolux E30EW85GPS manuals
Add to My Manuals
Save this manual to your list of manuals |
Page 6 highlights
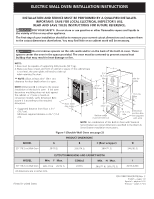
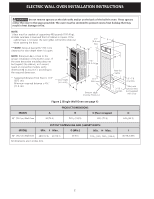
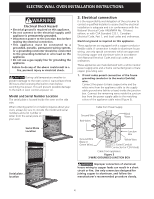
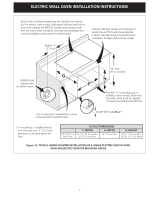
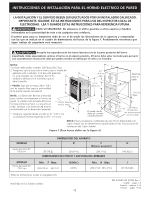
ELECTRIC WALL OVEN INSTALLATION INSTRUCTIONS 6. Cabinet Installation Heavy Weight Hazard • Use 2 or more people to move and install wall oven. • Failure to follow this instructions can result in injury or damage to the unit. The wall oven can tip when the door is opened. The mounting brackets supplied with the wall oven must be attached to the cabinet and the appliance to prevent tipping of the wall oven and injury to persons. Mounting Bracket Installation Instructions 1.Find the 2 mounting brackets and screws included in the literature package. 2.Install the mounting brackets in the cabinet as shown on figure 8. Note: To prevent damage to cabinet, it is recommended to drill 1/16" (0.16 cm) dia. pilot holes before installing the mounting brackets. F Single Oven see Fig. 1 Double Oven see Fig. 2 3" (7.6 cm) clearance between unit and front of cabinet Figure 9 Mounting Brackets Single Oven: 23 1/4" (59.1 cm) Double Oven: 46½" (118.1 cm) H Single Oven see Fig. 1 Double Oven see Fig. 2 1 Mounting bracket installed 2 Oven in cabinet Bracket Figure 10 3 Figure 8 3.Insert the unit into the cabinet opening. Slide unit inward Oven leaving 3" (7.6 cm) clearance between the oven and front of cabinet (Figure 9). Pull the armored cable through the hole in the floor and toward the junction box while moving the appliance inward. 4.Install now the bottom trim using the screws supplied withthe unit (Figure 10). 5.Push the unit in and against the cabinet, then the oven side bracket will clip in the one you just install on the side of the cabinet opening. To pull out the oven for servicing insert the tool supplied with the appliance both side at the same time in the hole located on the side frame and visible when the door is opened. After inserting the tool pull the oven towards you (see figure 11). 6.For typical under counter installation of an electric built-in oven see Figures 12 and 13. 6 Cabinet Right Side Tool supplied Mounting bracket released Oven removed from the cabinet Hole where to insert the tool Figure 11
-
 1
1 -
 2
2 -
 3
3 -
 4
4 -
 5
5 -
 6
6 -
 7
7 -
 8
8 -
 9
9 -
 10
10 -
 11
11 -
 12
12 -
13
-
14
-
15
-
16
-
17
-
18
-
19
-
20
-
21
-
22
-
23
-
24
-
25
-
26
-
27
-
28
 |
 |
