Electrolux E30WV60PPS Complete Owner's Guide (English) - Page 10
Electrical connection, Description of the Hood
 |
View all Electrolux E30WV60PPS manuals
Add to My Manuals
Save this manual to your list of manuals |
Page 10 highlights
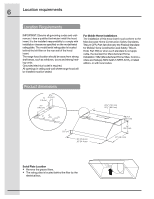
10 Electrical connection Electrical connection Description of the Hood WARNING Electrical Shock Hazard Warning: Turn off power circuit at the service panel before wiring this unit. 120 VAC, 15 or 20 Amp circuit required. ELECTRICAL GROUNDING INSTRUCTIONS THIS APPLIANCE IS FITTED WITH AN ELECTRICAL JUNCTION BOX WITH 3 WIRES, ONE OF WHICH (GREEN/YELLOW) SERVES TO GROUND THE APPLIANCE. TO PROTECT YOU AGAINST ELECTRIC SHOCK, THE GREEN AND YELLOW WIRE MUST BE CONNECTED TO THE GROUNDING WIRE IN YOUR HOME ELECTRICAL SYSTEM, AND IT MUST UNDER NO CIRCUMSTANCES BE CUT OR REMOVED. Failure to do so can result in death or electrical shock. •• Remove the knockout and the Junction box cover and install the conduit connector (cULus listed) in junction box. •• Run 3 wires; black, white and green, according to the National Electrical Code and local codes and ordinances, in 1⁄2" conduit from service panel to junction box. •• Connect black wire from service panel to black or red in junction box, white to white and green to green-yellow. •• Close and secure junction box cover. 21 3 4 6 1. Blower control switch 2. Light control switch 3. Lamp housings 5 4. Grease filter Handle 5. Grease filter 6. Serial / Rating plate (see page 6) Controls Use the high suction speed in cases of concentrated kitchen vapours. It is recommended that the cooker hood suction is switched on for 5 minutes prior to cooking and to leave in operation during cooking and for another 15 minutes approximately after terminating cooking. Description of control panel Final installation step •• Replace the 2 lateral supports. •• Replace filters. •• Check operation of the hood. If range hood does not operate: •• Check that the circuit breaker is not tripped or the house fuse blown. •• Disconnect power supply. •• Check that wiring is correct. 1. Light Control •• Turn the light switch (1) to the right 1 position for HIGH. •• Turn the light switch (1) to the right 2 positions for LOW. •• To turn the lights OFF, rotate the light switch (1) to the left to the OFF position. Keep your Installation Instructions and Use and Care Guide close to range hood for easy reference. 2. Fan Control The fan has 4 speeds. •• Rotate the fan switch (2) to the right to turn the fan ON. Continue to rotate the switch to the desired fan speed. •• To turn the fan OFF, rotate the fan speed (2) switch to the left to the OFF position.
-
 1
1 -
2
-
3
-
4
-
 5
5 -
 6
6 -
 7
7 -
 8
8 -
 9
9 -
 10
10 -
 11
11 -
 12
12
 |
 |
