Electrolux E48GC76EPS Installation Instructions - Page 14
Installation
 |
View all Electrolux E48GC76EPS manuals
Add to My Manuals
Save this manual to your list of manuals |
Page 14 highlights
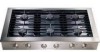
14 Installation INSTALLING THE COOKTOP Place and center the cooktop within the cutout. Secure the cooktop to the countertop utilizing the two (2) 1/4-20 bolts provided. Do not overtighten the screws. IMPORTANT Do not use a hardening compound or caulking to permanently seal the cooktop into place, as the unit must be readily removable for service. If such a hardening compound is used, removal of the unit will be at the customer's expense. CONNECTING THE GAS WARNING • The maximum gas supply pressure to the regulator must not exceed 1/2 pound per square inch. • Verify that the proper gas supply has been provided. • Do not apply excessive pressure when tightening connections and fittings. • Do not use plumber's putty or Teflon tape on gas compression connections. It can defeat the proper sealing of these fittings. Use plumber's putty or Teflon tape only on pipe thread fittings. • Turn all cooktop control valves to the "OFF" position, then turn on the gas supply. Check all supply lines and connections for leaks using a soap and water solution. Do not use a flame to check for leaks. After verifying that there are no gas leaks, turn off the gas supply to the cooktop by turning the gas shut-off valve to the off position. Leak testing of the appliance shall be conducted according to the manufacturer's instructions. • For LP gas installations, the LP gas tank must have its own high-pressure regulator. This is in addition to the pressure regulator supplied with the cooktop. Attach the gas pressure regulator (included with the cooktop) to cooktop pipe nipple inlet. Install a gas shut-off valve (not included with the cooktop) in the main gas supply line in an accessible location near the cooktop. Complete connection of the gas supply to the cooktop by installing 1/2 inch flexible gas line (not included with the cooktop) between the pressure regulator and the shut-off valve. IMPORTANT To prevent damage to the gas pressure regulator, install the regulator only after the cooktop is mounted in its permanent position. Ensure that the arrow on the regulator points in the direction of the gas flow towards the cooktop.
-
 1
1 -
2
-
3
-
4
-
5
-
6
-
7
-
8
-
 9
9 -
 10
10 -
 11
11 -
 12
12 -
 13
13 -
 14
14 -
 15
15 -
 16
16 -
 17
17 -
 18
18 -
 19
19 -
20
-
21
-
22
-
23
-
24
-
25
-
26
-
27
-
28
-
29
-
30
-
31
-
32
 |
 |
