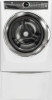
Electrolux EFLS627UIW Installation Instructions English - Page 12
Reversing Door
 |
View all Electrolux EFLS627UIW manuals
Add to My Manuals
Save this manual to your list of manuals |
Page 12 highlights
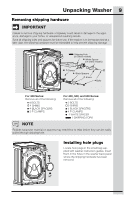
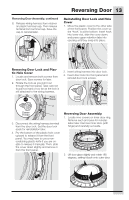
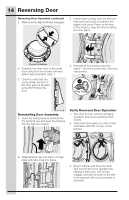
12 Reversing Door NOTE Door reversibility is available only on 500, or 600 series models. IMPORTANT Tools needed for reversal: BEFORE YOU REVERSE WASHER DOOR: 1. Be sure you have adequate swing area before reversing door. 2. Gather your tools - including a screw driver with a #2 square bit and plastic knife (or small, flat prying tool that won't damage paint). 3. Protect flat work surface, such as top of washer or floor near washer, with a soft cloth or towel. 4. Be sure washer is unplugged from power source! Screwdriver with #2 square bit Plastic knife WARNING ELECTRICAL SHOCK HAZARD Failure to disconnect power source before servicing could result in personal injury or even death. Removing Door Assembly 1. Completely open the door to expose all four hinge screws. 2. Remove all four hinge screws with #2 square bit driver. Save for reinstalling later. x4 4. While supporting the door with one hand, pinch the tabs to release the plastic terminal cap from the hinge plate. IMPORTANT Take care not to pull the door away from the washer until you remove the wiring harness terminal cap. Fine Thread 3. Hold the door with one hand supporting the handle area and one hand supporting the hinge. While supporting the door at the hinge, press firmly with the other hand until the locating pins on the back of the hinge plate dislocate from the front panel. 5. Set the door face down on a flat surface protected by soft cloth or towel.
-
 1
1 -
2
-
3
-
4
-
5
-
6
-
 7
7 -
 8
8 -
 9
9 -
 10
10 -
 11
11 -
 12
12 -
 13
13 -
 14
14 -
 15
15 -
 16
16 -
 17
17 -
18
-
19
-
20
-
21
-
22
-
23
-
24
-
25
-
26
-
27
-
28
-
29
-
30
-
31
-
32
-
33
-
34
-
35
-
36
-
37
-
38
-
39
-
40
-
41
-
42
-
43
-
44
-
45
-
46
-
47
-
48
-
49
-
50
 |
 |
