Electrolux EFMG627UTT Complete Owners Guide English - Page 37
STEPS, IMPORTANT, Cycle Selection, Cycle Settings, Setting Chart
 |
View all Electrolux EFMG627UTT manuals
Add to My Manuals
Save this manual to your list of manuals |
Page 37 highlights
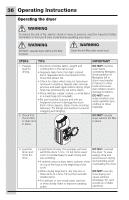
Operating Instructions 37 STEPS TIPS IMPORTANT 4. Select the appropriate cycle and settings for each load. • See Cycle Selection and Cycle Settings for Over-drying can detailed descriptions of cycle controls. cause wrinkles, • See Cycle Setting Charts to determine which shrinkage, lint, settings are available for each cycle. harshness, and a • To provide the best care, not every setting or option is available with every cycle. If a build up of static electricity. setting or option is not available for the cycle selected, the indicator will not light. See Setting Chart for information of available options for each cycle by model. To prevent unintentional and accidental exposure of delicate material • Adjustments made to most cycle settings will to excess heat be remembered and recalled each time that or unexpected cycle is selected in the future. To return to steam, the sanitize factory settings, press the dryness button and the options button at the same time and hold until the signal sounds. temperature setting and the perfect steam™ option will not be remembered and must be reselected each time. 5. Close the dryer door and start the drying cycle. 6. Remove items when done. 7. Clean the lint filter. To return to factory settings, • To sptarertstshethderydinryg lceyvcelel/,dcrlyonseesthseadnodor and presosptthieonsstabrut/tptoanussaetbthuettosna.me time • To aadnddahnoiltdemunttoil tthhee dsrigyenradl sruomun, dpsre. ss start/pause. Add the item, close the door and press start/pause to resume the cycle. • To change settings or options after the cycle has begun, press start/pause, change the settings, and then press start/pause. If the cycle is not paused first, the unit will emit several beeps when the buttons are pressed but no changes to the cycle will be applied. • To change the cycle once the cycle has begun, press cancel to cancel the cycle, select the new cycle, and press start/pause to begin the new cycle. Changing a cycle selection without cancelling the current WILL NOT change the cycle. • To cancel a cycle, press cancel. • A signal will sound at the end of the cycle if the chime option is not set to mute. • Immediately remove items when the cycle is completed and hang or fold. • See Care and Cleaning section of this instruction. • CLEAN LINT will be displayed at the end of the cycle as a reminder to remove lint from filter. The dryer WILL NOT operate with the door open. When drying a single large or bulky item, such as a comforter, pause the cycle part way through to turn the item "inside out" and maximize drying effectiveness. See product manufacturer's instructions. ALWAYS REMOVE LINT at the end of the cycle (see warning on previous page).
-
 1
1 -
2
-
3
-
4
-
5
-
6
-
7
-
8
-
9
-
10
-
11
-
12
-
13
-
14
-
15
-
16
-
17
-
18
-
19
-
20
-
21
-
22
-
23
-
24
-
25
-
26
-
27
-
28
-
29
-
30
-
31
-
 32
32 -
 33
33 -
 34
34 -
 35
35 -
 36
36 -
 37
37 -
 38
38 -
 39
39 -
 40
40 -
 41
41 -
 42
42 -
43
-
44
-
45
-
46
 |
 |
