Electrolux EI26SS55GW Complete Owner's Guide (English) - Page 25
Automatic Ice & Water Maker/Dispenser
 |
UPC - 012505694844
View all Electrolux EI26SS55GW manuals
Add to My Manuals
Save this manual to your list of manuals |
Page 25 highlights
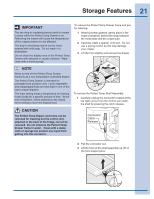
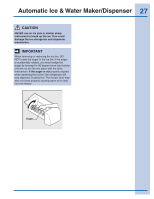
Automatic Ice & Water Maker/Dispenser 25 Priming the water supply system Your refrigerator's water supply system includes several tubing lines, an advanced water filter, a distribution valve bank, and a reserve tank to ensure ample supply to the ice and water dispenser at all times. This system needs to be completely filled with water when first connected to an external supply line. Using the ice maker after installation Before making ice for the first time, be sure to prime the water supply system. Air in new plumbing lines can result in two or three empty ice maker cycles. Furthermore, if the system is not flushed, the first ice cubes may be discolored or have an odd flavor. IMPORTANT CAUTION For proper dispenser operation, recommended water supply pressure should fall between 30 psi and 100 psi. Excessive pressure may cause water filter to malfunction. To prime the water supply system: 1 Begin filling the tank by pressing and holding a drinking glass against the water dispenser paddle. 2 Keep the glass in this position until water comes out of the dispenser. It may take about 1½ minutes. 3 Continue dispensing water for about three minutes to flush the system and plumbing connections of any impurities (stopping to empty the glass as necessary). NOTE Your ice maker is turned on at the factory so it can work as soon as you install your refrigerator. If you cannot connect a water supply, turn the ice maker's On/Off switch to Off. Otherwise, the ice maker's fill valve may make a loud chattering noise when it attempts to operate without water. Turning the ice maker on and off Ice production is controlled by the ice maker's On/ Off power switch. To gain access to the ice maker, pull the extra shelf out (some models). Press the switch to the "O" position to turn it Off and press to the "I" position to turn it On. OFF ON Wire Signal Arm The water dispenser has a built-in device that shuts off the water flow after three minutes of continuous use. To reset this shutoff device, simply release the dispenser paddle. Ice maker operation & care The ice maker, ice bin, and dispenser feeding mechanism are located in the top of the freezer compartment. After the refrigerator is installed properly and has cooled for several hours, the ice maker can produce ice within 24 hours. It can completely fill an ice bin in about two days. The ice maker produces four to six pounds of ice every 24 hours depending on usage conditions. Ice is produced at a rate of eight cubes every 75 to 90 minutes. NOTE The ice maker also has a built-in wire signal arm, which automatically stops ice production when the ice bin is full. This signal arm should not be used to manually stop the ice maker.
-
 1
1 -
2
-
3
-
4
-
5
-
6
-
7
-
8
-
9
-
10
-
11
-
12
-
13
-
14
-
15
-
16
-
17
-
18
-
19
-
 20
20 -
 21
21 -
 22
22 -
 23
23 -
 24
24 -
 25
25 -
 26
26 -
 27
27 -
 28
28 -
 29
29 -
 30
30 -
31
-
32
-
33
-
34
-
35
-
36
-
37
-
38
-
39
-
40
-
41
-
42
 |
 |