Electrolux EI30DS5CJS Installation Instructions (All Languages)
Electrolux EI30DS5CJS Manual
 |
View all Electrolux EI30DS5CJS manuals
Add to My Manuals
Save this manual to your list of manuals |
Electrolux EI30DS5CJS manual content summary:
- Electrolux EI30DS5CJS | Installation Instructions (All Languages) - Page 1
an Electric Oven and a Gas Cooktop) INSTALLATION AND SERVICE MUST BE PERFORMED BY A QUALIFIED INSTALLER. IMPORTANT: SAVE FOR LOCAL ELECTRICAL INSPECTOR'S USE. READ AND SAVE THESE INSTRUCTIONS FOR FUTURE REFERENCE. If the information in this manual is not followed exactly, a fire or explosion may - Electrolux EI30DS5CJS | Installation Instructions (All Languages) - Page 2
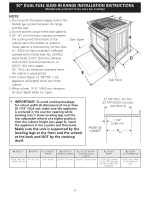
30" DUAL FUEL SLIDE-IN RANGE INSTALLATION INSTRUCTIONS (Models with an Electric Oven and a Gas Cooktop) height (see page 3), insert the appliance in the counter and then level. Make sure the unit is supported by the leveling legs at the front and the wheels at the back and NOT by the cooktop itself - Electrolux EI30DS5CJS | Installation Instructions (All Languages) - Page 3
30" DUAL FUEL SLIDE-IN RANGE INSTALLATION INSTRUCTIONS (Models with an Electric Oven and a Gas Cooktop) To the unit if needed. Metal Flange After the installation, MAKE SURE that the unit is 8 supported by the two front leveling legs and the two adjustable leveling wheels and NOT by the cooktop. - Electrolux EI30DS5CJS | Installation Instructions (All Languages) - Page 4
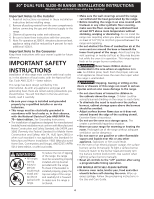
instructions with your owner's guide for future reference. IMPORTANT SAFETY INSTRUCTIONS Guide, read it carefully. • Be sure your range is installed and grounded properly by a qualified installer or service power outage, the surface burners can be lit manually. To light a surface burner, hold a lit - Electrolux EI30DS5CJS | Installation Instructions (All Languages) - Page 5
breaker or time-delay fuse. Risk of fire or electrical shock exists if an incorrect size range cord kit is used, the Installation Instructions are not followed, or the strain relief bracket is discarded. 2 Factory Connected Power Supply Cord (Canada only) This range is equipped with a factory - Electrolux EI30DS5CJS | Installation Instructions (All Languages) - Page 6
-IN RANGE INSTALLATION INSTRUCTIONS (Models with an Electric Oven and a Gas Cooktop) 3 Electrical Connection to the Range (U.S.A.) This appliance is manufactured with the neutral terminal connected to the frame. Note: Refer to the wiring diagram in the center pages of this manual. Three Conductor - Electrolux EI30DS5CJS | Installation Instructions (All Languages) - Page 7
30" DUAL FUEL SLIDE-IN RANGE INSTALLATION INSTRUCTIONS (Models with an Electric Oven and a Gas Cooktop) Terminal Block Silver Colored Terminal Red Wire Black wire 1-1/8" Dia. Direct Connection Hole. Punch out knockout for 1-3/8" - Electrolux EI30DS5CJS | Installation Instructions (All Languages) - Page 8
30" DUAL FUEL SLIDE-IN RANGE INSTALLATION INSTRUCTIONS (Models with an Electric Oven and a Gas Cooktop) 4 Cabinet Construction To eliminate the risk of burns or fire by reaching over heated surface units, do - Electrolux EI30DS5CJS | Installation Instructions (All Languages) - Page 9
range outside the cutout for cleaning or servicing. NOTE: Do not allow the flexible shall be conducted according to the manufacturer's instructions. Check for leaks. After connecting the range gas supply piping system by closing its individual manual shutoff valve during any pressure testing of the - Electrolux EI30DS5CJS | Installation Instructions (All Languages) - Page 10
power source, and turn off the manual gas shut-off valve. Make sure the range is cold. Remove the service drawer (warmer drawer on some is an added convenience. Refer to the Use and Care Guide for oven door removal instructions. Standard Installation 8.1 The range cooktop overlaps the countertop at - Electrolux EI30DS5CJS | Installation Instructions (All Languages) - Page 11
Font Leveling Leg LOWER LOWER RAISE Rear Leveling Device RAISE LOWER Figure 12 10 Check Operation Refer to the Use and Care Guide packaged with the range for operating instructions and for care and cleaning of your range. Do not touch the elements or burners. They may be hot enough to cause - Electrolux EI30DS5CJS | Installation Instructions (All Languages) - Page 12
30" DUAL FUEL SLIDE-IN RANGE INSTALLATION INSTRUCTIONS (Models with an Electric Oven and a Gas Cooktop) D. Be sure that all the burner caps and the triple burner head are correctly placed BEFORE using - Electrolux EI30DS5CJS | Installation Instructions (All Languages) - Page 13
fuel and the pressure the range was adjusted for when it left the factory. Before You Call for Service Read the Avoid Service Checklist and operating instructions in your Use and Care Guide. It may save you time and expense. The list includes common occurrences that are not the result of defective - Electrolux EI30DS5CJS | Installation Instructions (All Languages) - Page 14
on an open door or if a child climbs upon it. Serious injury might result from spilled hot liquids or from the range itself. Follow the instructions below to install the anti-tip brackets. If range is ever moved to a different location, the antitip brackets must also be moved and installed with - Electrolux EI30DS5CJS | Installation Instructions (All Languages) - Page 15
INSTRUCCIONES PARA USO DEL INSPECTOR LOCAL DE ELECTRICIDAD. LEA Y GUARDE ESTAS INSTRUCCIONES PARA REFERENCIA FUTURA. Si la información contenida en este manual no es seguida exactamente, puede ocurrir un incendio o explosión causando daños materiales, lesión personal o la muerte. PARA SU SEGURIDAD - Electrolux EI30DS5CJS | Installation Instructions (All Languages) - Page 16
INSTRUCCIONES DE INSTALACIÓN PARA LA ESTUFA DE FUEL DUAL DE 30" (Para Modelos con un Horno Eléctrico y una Estufa a Gas) NOTA: 1. No pellizque el cordón eléctrico o el conducto flexible de gas entre la estufa y la pared. 2. No selle la estufa a los armarios de lado. 3. Un espacio mínimo de 24" (61 - Electrolux EI30DS5CJS | Installation Instructions (All Languages) - Page 17
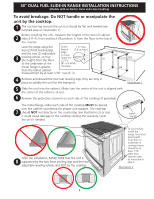
INSTRUCCIONES DE INSTALACIÓN PARA LA ESTUFA DE FUEL DUAL DE 30" (Para Modelos con un Horno Eléctrico y una Estufa a Gas) Para evitar fractura de la unidad: NO manipule la unidad sosteniendo la cubierta. 1 La cubierta alrededor del espacio donde usted instalara su unidad debe de estar plana y - Electrolux EI30DS5CJS | Installation Instructions (All Languages) - Page 18
DE 30" (Para Modelos con un Horno Eléctrico y una Estufa a Gas) Notas importantes para el Instalador 1. Lea todas las instrucciones contenidas en este manual antes de instalar la estufa. 2. Saque todo el material usado en el embalaje del compartimiento del horno antes de conectar el suministro el - Electrolux EI30DS5CJS | Installation Instructions (All Languages) - Page 19
INSTRUCCIONES DE INSTALACIÓN PARA LA ESTUFA DE FUEL DUAL DE 30" (Para Modelos con un Horno Eléctrico y una Estufa a Gas) 1 Estuche de cable del suministro eléctrico (U.S.A.) El utilizados es responsable de la conexión del cable del suministro eléctrico al bloque de conexión situado detrás del panel - Electrolux EI30DS5CJS | Installation Instructions (All Languages) - Page 20
Este aparato se fabrica con el terminal neutro conectado al marco. Refiere al diagrama de alambraje en las paginas de centro de este manual. Conexión de tres alambres de conducción a la estufa (Un cordón flexible o cable de 3 conductores debe de ser reemplazado con un cordón flexible o cable - Electrolux EI30DS5CJS | Installation Instructions (All Languages) - Page 21
INSTRUCCIONES DE INSTALACIÓN PARA LA ESTUFA DE FUEL DUAL DE 30" (Para Modelos con un Horno Eléctrico y una Estufa a Gas) Bloque terminal Terminal plata Alambre Rojo Alambre Negro 1-1/8" Dia. Agujero de la conexión directa.Retira la arandela pre-cortada para 1-3/8" Dia. Agujero Una arazadera de - Electrolux EI30DS5CJS | Installation Instructions (All Languages) - Page 22
INSTRUCCIONES DE INSTALACIÓN PARA LA ESTUFA DE FUEL DUAL DE 30" (Para Modelos con un Horno Eléctrico y una Estufa a Gas) 3 Construcción del armario Para eliminar el riesgo de quemaduras o de fuego tratando de alcanzar algo por encima de las zonas calientes, evite de colocar artículos sobre la - Electrolux EI30DS5CJS | Installation Instructions (All Languages) - Page 23
artefacto Válvula de cierre - A la linea de gas Abierta Figura 11 La línea del suministro se debe de ser equipada de una válvula de cierre manual aprobada. Esta válvula se debe localizar en el mismo cuarto que la estufa y debe estar en una localización que permita la facilidad de la abertura - Electrolux EI30DS5CJS | Installation Instructions (All Languages) - Page 24
La mudanza del aparato para reparaciones o limpieza Apague la corriente eléctrica a la estufa a la fuente de poder principal, y apague la válvula de cierre manual de gas. Asegúrese de que la estufa esté fresca. Quite el cajón de servicio (el cajón calentador en algunos modelos) y abre la puerta del - Electrolux EI30DS5CJS | Installation Instructions (All Languages) - Page 25
las patas y ruedas ajustables. 5. Si al cocina no se nivela, asegúrese que el piso este nivelado. 10 Comprobación del Funcionamiento Consulte el Manual del Usuario incluido con la estufa para instrucciones de operación y instrucciones para el cuidado y limpieza de su estufa. No toque los elementos - Electrolux EI30DS5CJS | Installation Instructions (All Languages) - Page 26
INSTRUCCIONES DE INSTALACIÓN PARA LA ESTUFA DE FUEL DUAL DE 30" (Para Modelos con un Horno Eléctrico y una Estufa a Gas) Tapa del quemador Base del quemador Figura 15 D. Asegúrese de que todas las tapas y la base del quemador. 10.2 Enciende la corriente eléctrica y abre la válvula principal de - Electrolux EI30DS5CJS | Installation Instructions (All Languages) - Page 27
la presión a la cual fue ajustada la estufa en la fábrica. Antes de Llamar al Servicio Lea la sección Evite Llamadas de Servicio en su Manual del Usuario. Esto le podrá ahorrar tiempo y gastos. Esta lista incluye ocurrencias comunes que no son el resultado de defectos de materiales o fabricación de - Electrolux EI30DS5CJS | Installation Instructions (All Languages) - Page 28
INSTRUCCIONES DE INSTALACIÓN PARA LA ESTUFA DE FUEL DUAL DE 30" (Para Modelos con un Horno Eléctrico y una Estufa a Gas) 11 Instrucciones de instalación de la fijación anti-inclinación Para reducir el riesgo de inclinación de la cocina, ésta debe ser asegurada hacia el piso con las fijaciones de - Electrolux EI30DS5CJS | Installation Instructions (All Languages) - Page 29
cuisson à gaz) UN INSTALLATEUR QUALIFIÉ DOIT EFFECTUER L'INSTALLATION ET LE SERVICE. IMPORTANT: CONSERVEZ CES INSTRUCTIONS POUR LES INSPECTEURS LOCAUX. LISEZ CES INSTRUCTIONS ET CONSERVEZ‑LES POUR RÉFÉRENCES ULTÉRIEURES. Si les instructions de ce manuel ne sont pas suivies à la lettre, il pourrait - Electrolux EI30DS5CJS | Installation Instructions (All Languages) - Page 30
INSTRUCTIONS D'INSTALLATION POUR CUISINIÈRE ENCASTRABLE DE 30" À ALIMENTATION MIXTE (Modè (page 31), insérez l'appareil dans le comptoir et ensuite nivelez- le. Assurez-vous que l'appareil est bien supporté par les pattes et roulettes de nivellement et non par la table de cuisson. 22 7/8" (58,1 cm) - Electrolux EI30DS5CJS | Installation Instructions (All Languages) - Page 31
INSTRUCTIONS D'INSTALLATION POUR CUISINIÈRE ENCASTRABLE DE 30" À ALIMENTATION MIXTE (Modèles de chaque côté de la table de cuisson DOIT reposer sur le comptoir pour que l'appareil soit bien supporté. 7 La table de cuisson ne doit PAS toucher directement le comptoir (voir illustration 2), sinon cela - Electrolux EI30DS5CJS | Installation Instructions (All Languages) - Page 32
importante au consommateur Conservez ces instructions avec le guide de l'utilisateur pour référence ultérieure. INSTRUCTIONS DE SÉCURITÉ IMPORTANTES Cette cuisini le tiroir la cuisinière. de rangement et s'assurer que les supports sont enclenchés. N'installez pas la cuisinière sur un tapis, à - Electrolux EI30DS5CJS | Installation Instructions (All Languages) - Page 33
, ou un connecteur mis à la terre doit être branché à la borne de mise à la terre ou directement sur l'appareil. Si vous ne suivez pas les instructions précitées à la lettre, il peut en résulter un incendie, des blessures ou un choc électrique. Ne desserrez pas les écrous des fils install - Electrolux EI30DS5CJS | Installation Instructions (All Languages) - Page 34
INSTRUCTIONS D'INSTALLATION POUR CUISINIÈRE ENCASTRABLE DE 30" À ALIMENTATION MIXTE (Modèles avec four électrique et plaque de cuisson à gaz) 3 Connexions électriques à la cuisinière (U.S.A.) Cet - Electrolux EI30DS5CJS | Installation Instructions (All Languages) - Page 35
et à la boîte de jonction). Les grosseurs des fils (fil en cuivre seulement) et des raccordements doivent se conformer à la capacité de l'appareil. Instructions de mise à la terre Cet appareil est fabriqué avec un fil d'alimentation neutre (blanc) et un fil de mise à la terre vert ou dénudé reli - Electrolux EI30DS5CJS | Installation Instructions (All Languages) - Page 36
INSTRUCTIONS D'INSTALLATION POUR CUISINIÈRE ENCASTRABLE DE 30" À ALIMENTATION MIXTE (Modèles avec four électrique et plaque de cuisson à gaz) Fil dénudé Câble d'alimentation Fils rouges - Electrolux EI30DS5CJS | Installation Instructions (All Languages) - Page 37
INSTRUCTIONS D'INSTALLATION POUR CUISINIÈRE ENCASTRABLE DE 30" À ALIMENTATION MIXTE (Modèles avec four électrique et plaque de cuisson à gaz) L'alimentation en gaz peut provenir par - Electrolux EI30DS5CJS | Installation Instructions (All Languages) - Page 38
. Les vérifications contre les fuites doivent être effectuées conformément aux instructions du manufacturier. Veillez à ce qu'il n'y ait pas de fuites. Apr ériels. 7 Déplacement de l'appareil en vue d'en faire le service ou pour faire du nettoyage Coupez l'alimentation électrique de l'appareil - Electrolux EI30DS5CJS | Installation Instructions (All Languages) - Page 39
l'appareil à sa position finale. Suivez les instructions à la page 42 ou sur le gabarit fourni avec le support anti- bascule de l'appareil. 8.8 Afin nécessaire pour moulure arrière dans un centre de service. Installation de panneaux latéraux Vous pouvez commander un nécessaire pour panneaux latéraux - Electrolux EI30DS5CJS | Installation Instructions (All Languages) - Page 40
INSTRUCTIONS D'INSTALLATION POUR CUISINIÈRE ENCASTRABLE DE 30" À ALIMENTATION MIXTE (Modèles avec four électrique et plaque de cuisson à gaz) 10 Vérification du Fonctionnement Référez‑vous au Guide de l'utilisateur inclus avec la cuisinière pour les directives de fonctionnement et pour l'entretien - Electrolux EI30DS5CJS | Installation Instructions (All Languages) - Page 41
pression à laquelle la cuisinière a été réglée au moment de l'expédition. Avant d'appeler le service d'entretien Révisez la liste de vérifications préventives et les instructions d'opération dans votre Guide de l'utilisateur. Vous sauverez probablement du temps et de l'argent. La liste contient les - Electrolux EI30DS5CJS | Installation Instructions (All Languages) - Page 42
ou si un enfant y grimpe. Les renversements de liquides chauds ou la cuisinière peuvent provoquer de sérieuses blessures. Suivez les instructions ci‑dessous pour installer le support anti‑bascule. Si vous déplacez la cuisinière pour l'installer à un autre endroit, vous devez également déplacer le - Electrolux EI30DS5CJS | Installation Instructions (All Languages) - Page 43
WIRING DIAGRAM - Diagrama de cables- SCHÉMA DE CÂBLAGE For models/ Para el modelos/ Pour les modèles: EI30DS55JX & EI30D5CJX 43 - Electrolux EI30DS5CJS | Installation Instructions (All Languages) - Page 44
WIRING DIAGRAM - Diagrama de cables- SCHÉMA DE CÂBLAGE For models/ Para el modelos/ Pour les modèles: EW30DS65GX & EW30DS6CGX 44
-
 1
1 -
 2
2 -
 3
3 -
 4
4 -
 5
5 -
 6
6 -
 7
7 -
8
-
9
-
10
-
11
-
12
-
13
-
14
-
15
-
16
-
17
-
18
-
19
-
20
-
21
-
22
-
23
-
24
-
25
-
26
-
27
-
28
-
29
-
30
-
31
-
32
-
33
-
34
-
35
-
36
-
37
-
38
-
39
-
40
-
41
-
42
-
43
-
44
 |
 |
30" DUAL FUEL SLIDE-IN RANGE INSTALLATION INSTRUCTIONS
(Models with an Electric Oven and a Gas Cooktop)
P/N 318201687 (1007) Rev. A
English – pages 1-14;
Español – páginas 15-28;
Français – pages 29-42;
Wiring Diagrams - pages 43-44
If the information in this manual is not followed exactly, a fire
or explosion may result causing property damage, personal injury or death.
FOR YOUR SAFETY:
—
Do not store or use gasoline or other flammable vapors and liquids in the
vicinity of this or any other appliance.
—
WHAT TO DO IF YOU SMELL GAS:
•
Do not try to light any appliance.
•
Do not touch any electrical switch; do not use any phone in your building.
•
Immediately call your gas supplier from a neighbor's phone. Follow the
gas supplier's instructions.
•
If you cannot reach your gas supplier, call the fire department.
—
Installation and service must be performed by a qualified installer, service
agency or the gas supplier.
INSTALLATION AND SERVICE MUST BE PERFORMED BY A QUALIFIED INSTALLER.
IMPORTANT: SAVE FOR LOCAL ELECTRICAL INSPECTOR'S USE.
READ AND SAVE THESE INSTRUCTIONS FOR FUTURE REFERENCE.
NOTE: Wiring diagram for these appliances are enclosed in this booklet.
Printed in United States
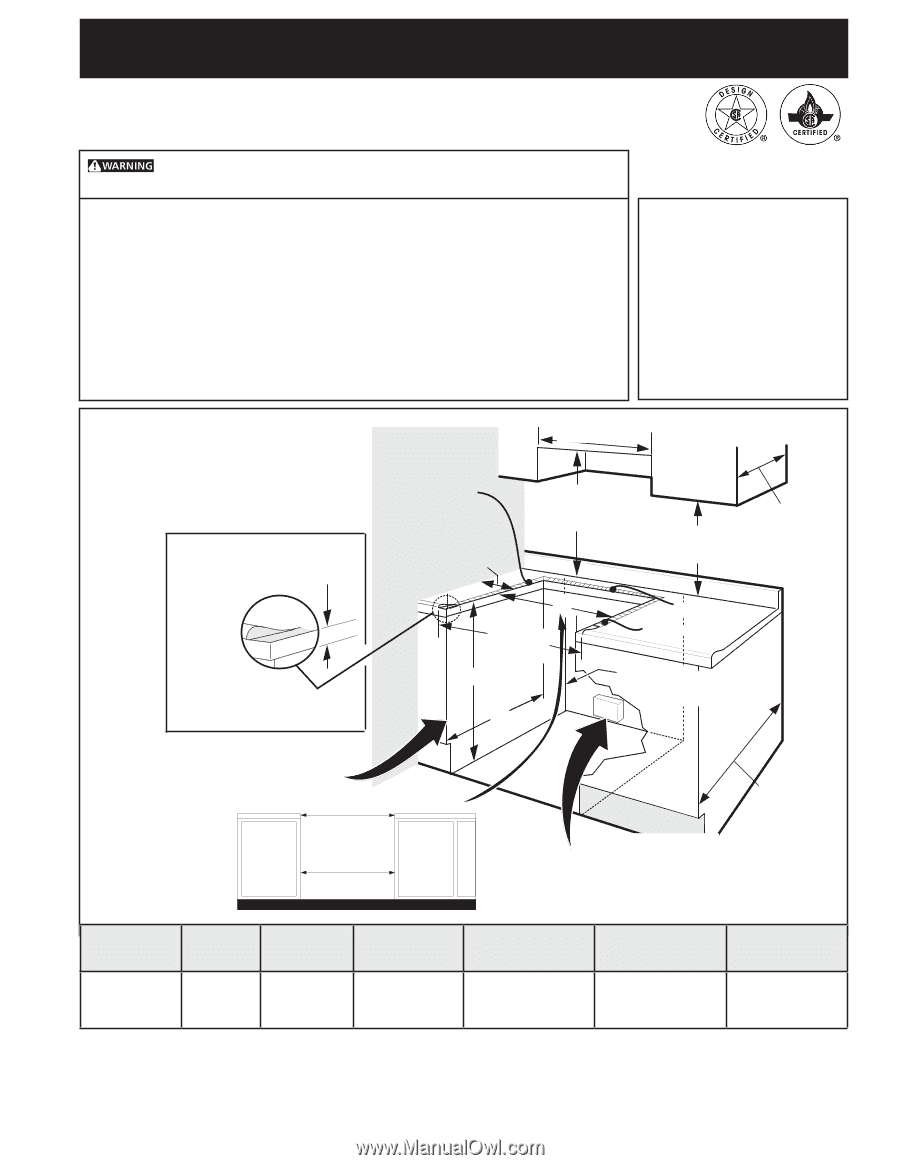
1/2” min.
3/8” min.
1/2” min.
WALL
5" Min.
(12,7 cm Min.)
From Wall Both Sides
30" Min.
(76,2 cm Min.)
30" Min.
(76,2 cm) Min.
(see Note 3)
18" Min.
(45,7 cm) Min.
Approx. 1 7/8"
(4,8 cm)
Grounded Junction Box or Wall Outlet
Should Be Located 8" to 17" (20,3 cm to
43,2 cm) From Right Cabinet and 2" to 4"
(5,1 cm to 10,2 cm) From Floor.
Locate Cabinet Doors 1" (2,5 cm)
Min. from Cutout Opening.
F
G
E
31 1/2"
(81 cm)
Exact
13"
(33 cm)
24" Min.
(61 cm Min.)
Shave
Raised
Edge
to Clear
Space
for a 31½"
(80 cm) Wide
Cooktop.
1 ½" Max.
(3,8 cm Max.)
These surfaces should be flat
& leveled (hatched area).
Appliances Installed in the
state of Massachusetts:
This Appliance can only
be installed in the state of
Massachusetts by a Massachusetts
licensed plumber or gasfitter.
This appliance must be installed
with a three (3) foot / 36 in. long
flexible gas connector.
A"T" handle type manual gas
valve must be installed in the gas
supply line to this appliance.
Refer to your serial plate
for applicable agency
certification
E
E
A
. HEIGHT
B
.
WIDTH
C.
COOKTOP
WIDTH
D
.
DEPTH TO
FRONT OF RANGE
E
.
CUTOUT WIDTH*
(Countertop and
Cabinet)
F
.
CUTOUT
DEPTH
G
.
HEIGHT
OF COUNTERTOP
35 5/8" (90.5 cm)
- 36 5/8" (93 cm)
30" (76,2 cm)
31½" (80 cm)
28 5/16" (71,9 cm)
30±1/16" (76,2±0,15 cm)
21 3/4" (55,2 cm) Min.
22 1/8" (56,2 cm) Max
24" (61 cm) Min. with
backguard
36 5/8" (93 cm) Max.
35 ¾" (90,8 cm) Min.
IMPORTANT:
Cabinet and
countertop width
should match the
cutout width.