Electrolux EI33AR80WS Trim Kit Installation Instructions English
Electrolux EI33AR80WS Manual
 |
View all Electrolux EI33AR80WS manuals
Add to My Manuals
Save this manual to your list of manuals |
Electrolux EI33AR80WS manual content summary:
- Electrolux EI33AR80WS | Trim Kit Installation Instructions English - Page 1
1 INSTRUCTION SHEET Single-Door All Refrigerator and All Freezer Trim Kit Installation Product Line: All Refrigerator and All Freezer Models Serial 66HH 77HH QTY 1 2 12 6 2 2H 2.12" Ref 11HH 3H 4H 5H 5" Ref ©2021 Electrolux Home Products, Inc. Instruction Sheet A00343906 9.30.21 - Electrolux EI33AR80WS | Trim Kit Installation Instructions English - Page 2
6 A17111301 Leveler Assembly 4 7 A20841301 Hardware Pack U19, Single 1 Brand Electrolux Item # Part Number Kit # Dual Trim Kit # TRMKTSS2FL79 A16404902 Description Pack U19, Single 1 6 1A 2A 1B 2B 3A 3B 3C 4 5 ©2021 Electrolux Home Products, Inc. Instruction Sheet A00343906 9.30.21 - Electrolux EI33AR80WS | Trim Kit Installation Instructions English - Page 3
Trim Support 0.87" Ref 10H QTY 1 2 4 6 2 1 8 2 1 Dual Trim Kit Components (84˝ Tall Cabinet Cutouts) Item # Brand Electrolux Part Assembly 4 7 A20841302 Hardware Pack U19, Double 1 8 A19036701 Side Trim Attachment 2 INSTRUCTION SHEET 6H 7H 2H 2.12" Ref 3H 1H 4H 5H 5" Ref 8H 9H - Electrolux EI33AR80WS | Trim Kit Installation Instructions English - Page 4
Flathead, #8-32 Screw, Round, #8-18 Bolt, M5 x 16 Bolt, ¼-20 Screw, 10-24 x ¾ Tie Bar, Bottom Center Trim Support 0.87" Ref 10H QTY 1 2 12 14 4 8 2 1 2.12" Ref 9H 12.21" Ref INSTRUCTION SHEET 2H 3H 1H 4H 5" Ref 5H 8H ©2021 Electrolux Home Products, Inc. Instruction Sheet A00343906 9.30.21 - Electrolux EI33AR80WS | Trim Kit Installation Instructions English - Page 5
" minimum 1.021" minimum (25.9 mm) 33" +/- 0.032" 24" minimum 0.706" minimum (17.9 mm) 35.5" +/- 0.032" Cabinet Cutout Dimensions Use these dimensions to build kitchen cabinet openings for the refrigerator and freezer. ©2021 Electrolux Home Products, Inc. Instruction Sheet A00343906 9.30.21 - Electrolux EI33AR80WS | Trim Kit Installation Instructions English - Page 6
Use & Care Manual. Min. 35.01" Max. 35.57" Min. 36.88" Max. 37.67" Min. 79.22" Max. 80.18" Min. 83.88" Max. 84.85" Trim Kit Finished Dimensions Use these dimensions to layout adjoining cabinet door, drawers, and shelves. ©2021 Electrolux Home Products, Inc. Instruction Sheet A00343906 9.30 - Electrolux EI33AR80WS | Trim Kit Installation Instructions English - Page 7
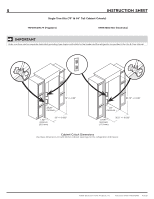
new construction, use a 25.25" cabinet depth dimension. NOTE To install a dual trim kit or a pairing kit, a partition cannot exist between the Freezer and the Refrigerator. TRMKTEZ2FL75 (Frigidaire) TRMKTEZ2FL79 (Frigidaire) TRMKTSS2FL79 (Electrolux) TRMKTEZ2LV79 (Frigidaire) 75" +/- 0.06" 79 - Electrolux EI33AR80WS | Trim Kit Installation Instructions English - Page 8
new construction, use a 25.25" cabinet depth dimension. NOTE To install a dual trim kit or a pairing kit, a partition cannot exist between the Freezer and the Refrigerator. TRMKTEZ2FL75 (Frigidaire) TRMKTEZ2FL79 (Frigidaire) TRMKTSS2FL79 (Electrolux) TRMKTEZ2LV79 (Frigidaire) Min. 68.01" Max - Electrolux EI33AR80WS | Trim Kit Installation Instructions English - Page 9
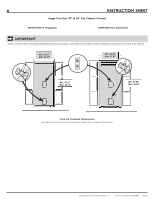
Cutouts) TRMKTSS2LV84 (Electrolux) 83.75" +/- 0.06" 24" minimum 71.5" +/- 0.032" 0.706" minimum (17.9 mm) Cabinet Cutout Dimensions Use these dimensions to build kitchen cabinet openings for the refrigerator and freezer. ©2021 Electrolux Home Products, Inc. Instruction Sheet A00343906 9.30 - Electrolux EI33AR80WS | Trim Kit Installation Instructions English - Page 10
10 INSTRUCTION SHEET Dual Trim Kits (84" Tall Cabinet Cutouts) TRMKTSS2LV84 (Electrolux) Min. 72.88" Max. 73.67" Min. 83.88" Max. 84.85" Trim Kit Finished Dimensions Use these dimensions to layout adjoining cabinet door, drawers, and shelves. IMPORTANT Use two recessed duplex electrical - Electrolux EI33AR80WS | Trim Kit Installation Instructions English - Page 11
11 INSTRUCTION SHEET Instructions for Dual Installation Trim Kits: TRMKTEZ2FL75 (Frigidaire) TRMKTEZ2LV79 (Frigidaire) TRMKTEZ2FL79 (Frigidaire) TRMKTSS2FL79 (Electrolux) TRMKTSS2LV84 (Electrolux) Power and Water Line Connection NOTE Refer to the Use & Care Manual for power requirements and - Electrolux EI33AR80WS | Trim Kit Installation Instructions English - Page 12
6) using a flathead screwdriver or a 3/8" socket wrench. Fig. 3 Fig. 4 INSTRUCTION SHEET Trim Kit Center Trim Support 4. With the refrigerator still on its back, use a 5/16" nut driver to in Fig. 7. Fig. 6 Fig. 7 ©2021 Electrolux Home Products, Inc. Instruction Sheet A00343906 9.30.21 - Electrolux EI33AR80WS | Trim Kit Installation Instructions English - Page 13
13 INSTRUCTION SHEET Pairing Kit Installation Before cleaning your appliance, turn off power to your appliance by unplugging the power cord to the power supply is facing down (Fig. 12). C B A Fig. 10 B A Fig. 11 Fig. 12 ©2021 Electrolux Home Products, Inc. Instruction Sheet A00343906 9.30.21 - Electrolux EI33AR80WS | Trim Kit Installation Instructions English - Page 14
can help remedy door alignment issues. Refer to INSTALLATION in the Use & Care Manual to adjust the door height. Fig. 18 dimensions. We recommend you leave approximately ½" of screw extending away from the cabinet wall. 0.50 inches B Fig. 20 Fig. 20 ©2021 Electrolux Home Products, Inc. Instruction - Electrolux EI33AR80WS | Trim Kit Installation Instructions English - Page 15
screw as seen in Fig. 21 and fitting over the top trim (Fig. 24). Fig. 24 INSTRUCTION SHEET Electrolux TRMKTSS2LV84 Side Trim Installation 25. a. Slide the left Side Trim into place by carefully guiding the Side Trim Attachment slots. Fig. 25 shows an inside view. b. Fasten 2H screws to the - Electrolux EI33AR80WS | Trim Kit Installation Instructions English - Page 16
16 Instructions for Single Installation Trim Kits: TRMKTEZ1FL79 (Frigidaire) TRMKTSS1LV84 (Electrolux) CAUTION Appliances are heavy. Installation requires two people. Leveling System Installation 1. a. Lay the unit on its back on packing material or a drop cloth to prevent damage and protect - Electrolux EI33AR80WS | Trim Kit Installation Instructions English - Page 17
the dual installation is centered. b. Drill 1/8" pilot holes and fasten two 3H screws on the right side of the Top Trim with a Phillips screwdriver to cabinets (Fig. 13). c. Repeat for the left side. Fig. 12 Fig. 13 Fig. 20 Fig. 9 ©2021 Electrolux Home Products, Inc. Instruction Sheet A00343906 - Electrolux EI33AR80WS | Trim Kit Installation Instructions English - Page 18
Hand tighten only! Fig. 14 Electrolux TRMKTSS1LV84 Side Trim Installation 11. a. Slide the left Side Trim into place by carefully guiding the Side Trim hooks through Manual to adjust the door height if needed. Fig. 16 ©2021 Electrolux Home Products, Inc. Instruction Sheet A00343906 9.30.21
-
 1
1 -
 2
2 -
 3
3 -
 4
4 -
 5
5 -
 6
6 -
 7
7 -
8
-
9
-
10
-
11
-
12
-
13
-
14
-
15
-
16
-
17
-
18
 |
 |
INSTRUCTION SHEET
©2021 Electrolux Home Products, Inc.
Instruction Sheet A00343906
9.30.21
1
NOTE:
All Hardware Pack components
mentioned throughout this instruction sheet
will have an “H” after the item number.
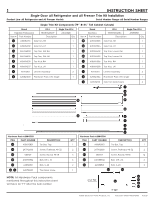
Single-Door All Refrigerator and All Freezer Trim Kit Installation
Product Line: All Refrigerator and All Freezer Models
Serial Number Range: All Serial Number Ranges
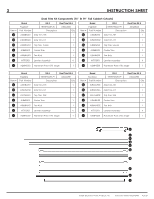
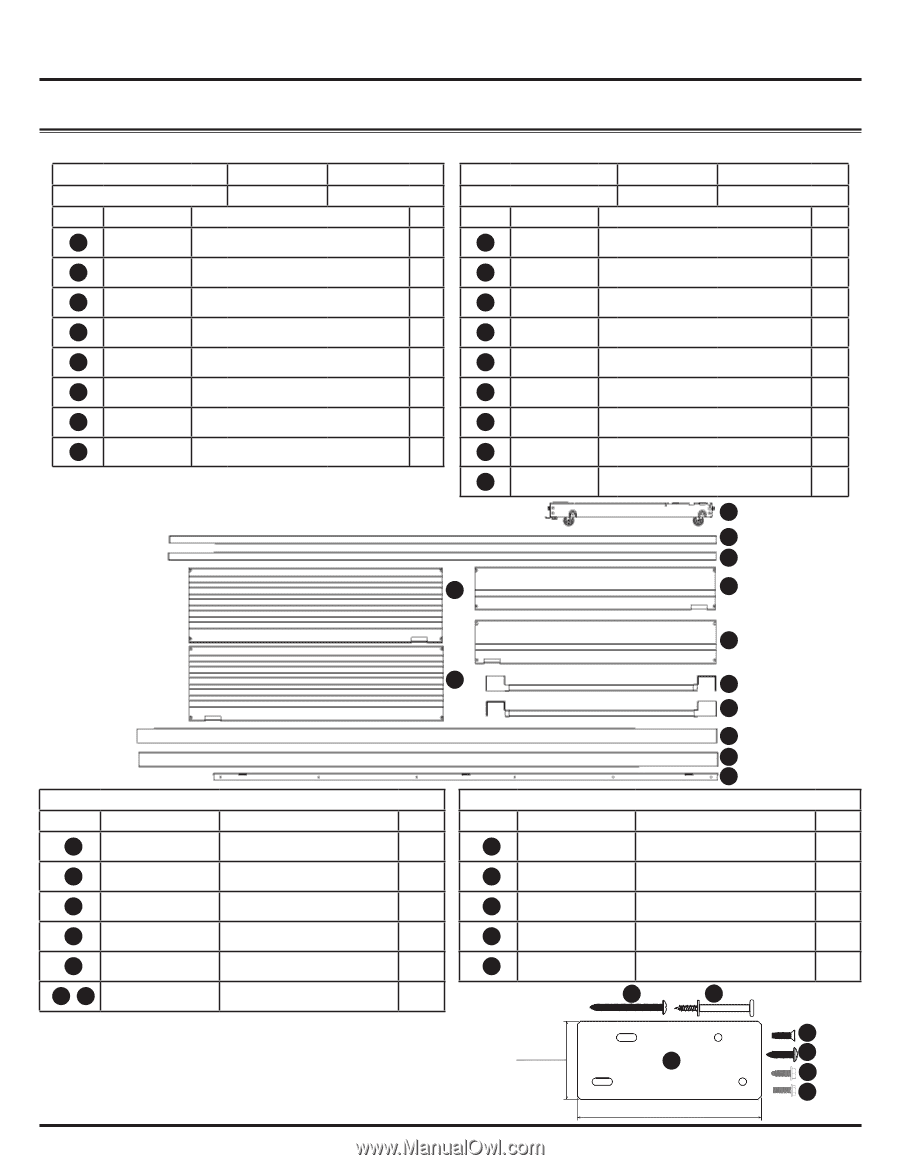
Single Trim Kit Components (79˝ & 84˝ Tall Cabinet Cutouts)
Brand
Kit #
Single Trim Kit #
Frigidaire Professional
TRMKTEZ1FL79
A16405201
Item #
Part Number
Description
Qty
1A
A18684901
Side Trim, RH
1
2A
A18684902
Side Trim, LH
1
3A
A16766503
Top Trim, Flat RH
1
4A
A16766505
Top Trim, Flat LH
1
5
A18684505
Toe Kick, RH
1
6
A18684507
Toe Kick, LH
1
7
A17111301
Leveler Assembly
2
8
A20841303
Hardware Pack U19, Single
1
Brand
Kit #
Single Trim Kit #
Electrolux
TRMKTSS1LV84
A19895901
Item #
Part Number
Description
Qty
1B
A19036503
Side Trim, RH
1
2B
A19036504
Side Trim, LH
1
3B
A19036402
Top Trim, Louver RH
1
4B
A19036403
Top Trim, Louver LH
1
5
A18684506
Toe Kick, RH
1
6
A18684508
Toe Kick, LH
1
7
A17111301
Leveler Assembly
2
8
A20841304
Hardware Pack U19, Single
1
9
A19036701
Side Trim Attachment
2
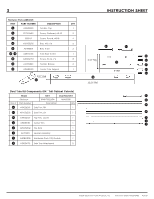
Hardware Pack A20841303
ITEM
PART NUMBER
DESCRIPTION
QTY
1H
A18695801
Tie-Bar, Top
1
2H
297142600
Screw, Flathead, #8-32
2
3H
050149
Screw, Round, #8-18
4
4H
A16955502
Bolt, M5 x 16
6
5H
A21188301
Bolt, ¼-20
2
6H
,
7H
A20706101
Trim Base Screw
1
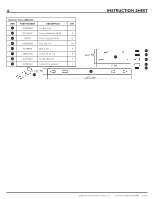
Hardware Pack A20841304
ITEM
PART NUMBER
DESCRIPTION
QTY
1H
A18695801
Tie-Bar, Top
1
2H
297142600
Screw, Flathead, #8-32
2
3H
050149
Screw, Round, #8-18
12
4H
A16955502
Bolt, M5 x 16
6
5H
A21188301
Bolt, ¼-20
2
7
1A
2A
3A
4A
5
6
1B
2B
9
3B
4B
3B
4B
7
1A
2A
3A
4A
5
6
7
8
9
6H
7H
1H
2.12
"
Ref
5
"
Ref
6H
7H
1H
2H
3H
4H
5H