Electrolux EI36DD10KS Complete Owner's Guide (English)
Electrolux EI36DD10KS Manual
 |
View all Electrolux EI36DD10KS manuals
Add to My Manuals
Save this manual to your list of manuals |
Electrolux EI36DD10KS manual content summary:
- Electrolux EI36DD10KS | Complete Owner's Guide (English) - Page 1
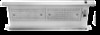
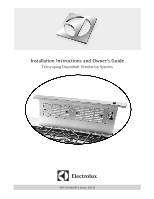
Installation Instructions and Owner's Guide Telescoping Downdraft Ventilation Systems P/N 316902914 (June 2012) - Electrolux EI36DD10KS | Complete Owner's Guide (English) - Page 2
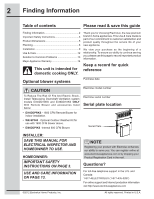
Instructions 3 Product Dimensions 5 Planning 6 Installation 9 Use & Care 12 Solution to Common Problems 13 Major Appliance Warranty 14 This unit is intended for domestic cooking ONLY. Thank you for choosing Electrolux, the new premium brand in home appliances. This Use & Care Guide is part - Electrolux EI36DD10KS | Complete Owner's Guide (English) - Page 3
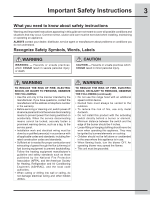
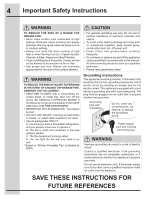
Instructions appearing in this guide are not meant to cover all possible conditions and situations that may occur. Common sense, caution and care must be exercised when installing, maintaining or operating an appliance. ALWAYS contact your dealer, distributor, service Heating, Refrigeration and Air - Electrolux EI36DD10KS | Complete Owner's Guide (English) - Page 4
laden surfaces frequently. • Do not repair or replace any part of this appliance unless specifically recommended in this manual. All other servicing should be done by a qualified technician. • Please read specification label Grounding Instructions This appliance must be grounded. In the event of an - Electrolux EI36DD10KS | Complete Owner's Guide (English) - Page 5
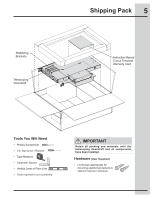
Stabilizing Brackets Telescoping Downdraft Shipping Pack 5 Instruction Manual Cutout Template Warranty Card Tools You Will Need • Phillips and materials until the telescoping downdraft and all components have been installed. Hardware (User Supplied) • (4) Screws appropriate for mounting - Electrolux EI36DD10KS | Complete Owner's Guide (English) - Page 6
6 Dimensions Product Dimensions A Telescopic Vent CHhoausssiinsg Top Trim E RISE 1-7/16" (3.7 cm) 2-1/4" C (5.7 cm) D TDrauncst ition B 5-9/16" (14.1 cm) Control Box Model EI30DD10KS EI36DD10KS A 30" (76.2 cm) 36" (91.4 cm) B 26 7/8" (68.3 cm) 32 7/8" (83.6 cm) C 17 13/16" (45.2 cm) D - Electrolux EI36DD10KS | Complete Owner's Guide (English) - Page 7
of air flow of this appliance may affect the gas flame on some gas cooktop models. Extreme caution must be used to assure proper flame is generated and maintained through the operating range of the vent. Refer to cooktop Installation Instructions and Use and Care guide for proper gas burner setup - Electrolux EI36DD10KS | Complete Owner's Guide (English) - Page 8
discharge, the transition duct needs to be rotated for proper venting. The transition duct must be removed to gain access to control box. Final installation of transition duct can not be made until blower electrical connection to control box is complete. Plan the Discharge Hex Head Screws Fig - Electrolux EI36DD10KS | Complete Owner's Guide (English) - Page 9
a location which will allow the unit's power cord to reach. Install Electrical Supply Outlet - Mount a standard wiring box, with 3-pronged grounded and connect it to receptacle. NOTE If the 30" model is being installed in a 30" wide cabinet or the 36" model in a 36" wide cabinet, the outlet cannot - Electrolux EI36DD10KS | Complete Owner's Guide (English) - Page 10
Cut Countertop Opening - Lay out and cut the cooktop cut-out far enough forward so downdraft will fit behind it (refer to cooktop installation instructions). - Set cooktop in place and slide it as far forward as possible. Center and square it with edges of countertop. A ½" minimum clearance behind - Electrolux EI36DD10KS | Complete Owner's Guide (English) - Page 11
Remove the Duct Transition Remove the Duct Transition from the Chassis Housing by removing the two Phillips screws as shown and sliding the Duct Transition out of the tabs. Installation 11 Tabs Duct Transition Phillips Head Screw Phillips Head Screw - Electrolux EI36DD10KS | Complete Owner's Guide (English) - Page 12
installation instructions. NOTE If you purchased Internal Blower Kit EI06DDPIKS refer to the installation manual provided with the kit for proper installation instructions supplied with the unit are made for 14 AWG wire. The installer must supply correct wire nuts if a different wire size is used - Electrolux EI36DD10KS | Complete Owner's Guide (English) - Page 13
and specifications of ALL duct used. Always use an appropriate roof or wall cap with damper. IMPORTANT All ductworks must be as installed as sure the power cord is routed beneath the appliance and away from heat generated by the cooktop. Install Cooktop - Align the cooktop with the downdraft and - Electrolux EI36DD10KS | Complete Owner's Guide (English) - Page 14
14 Installation Calculating Duct Length Table For maximum efficiency, use the shortest and straightest duct possible. The system will operate most efficiently when the ductwork does not - Electrolux EI36DD10KS | Complete Owner's Guide (English) - Page 15
Use & Care 15 Operating the Telescoping Downdraft System - Raise the downdraft by pressing the raise/lower push button. The telescoping vent will rise up to full height. - The blower can also be turned off by simply pressing the raise/lower push button and lowering the telescoping vent. - The - Electrolux EI36DD10KS | Complete Owner's Guide (English) - Page 16
clean water. - Wring excess water from the dishcloth when cleaning or rinse. Excess water in the controls may cause permanent damage to the appliance. - Only use kitchen cleaners that are especially made for cleaning stainless steel. - Always be sure to rinse cleaners from the surface as permanent - Electrolux EI36DD10KS | Complete Owner's Guide (English) - Page 17
Solutions to Common Problems 17 Before you call Problem Solution Telescoping Vent does not fully raise Blower does not turn on - Check for and will shut off until cooled sufficiently. It will resume normal operation when cool. Questions or for service call: 1-877-4ELECTROLUX (1-877-435-3287) - Electrolux EI36DD10KS | Complete Owner's Guide (English) - Page 18
this warranty. Obligations for service and parts under this warranty must be performed by Electrolux or an authorized service company. Product features or specifications as described or illustrated are subject to change without notice. USA 1.800.944.9044 Electrolux Home Products, Inc., 10200 David
-
 1
1 -
 2
2 -
 3
3 -
 4
4 -
 5
5 -
 6
6 -
 7
7 -
8
-
9
-
10
-
11
-
12
-
13
-
14
-
15
-
16
-
17
-
18
 |
 |
Installation Instructions and Owner’s Guide
Telescoping Downdraft Ventilation Systems
P/N 316902914 (June 2012)