Electrolux EL7085ADX Installation Instructions (English, Spanish, French) - Page 7
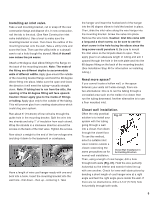
Installing an inlet valve., Need more space?, Closet wall installation.
 |
View all Electrolux EL7085ADX manuals
Add to My Manuals
Save this manual to your list of manuals |
Page 7 highlights
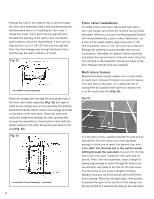
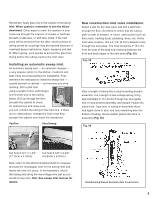
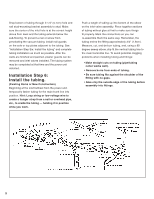
Installing an inlet valve. Take a wall mounting bracket, cut or snap off the new construction flange and dispose of it. In new construction, nail the tab to the stud. (See New Construction inlet valve installation.) Use a level to make sure the mounting bracket is level. Then trace the outline of the mounting bracket onto the wall. Take a utility knife and score the lines. Then use the utility knife or a drywall saw to cut a hole though the drywall. Hint: A drywall saw makes the job easier. Attach a 90 degree dual elbow fitting to the flange on the back of the mounting bracket. Note: The ends of the fitting are different depths to accommodate walls of different widths. Apply glue around the outside of the mounting bracket flange and twist the 90 degree elbow fitting into place. Make sure the open end faces the direction it will meet the tubing-usually straight down. Note: If tubing has to run from the attic, the opening of the 90 degree fitting will face upward. Caution: Never apply glue to the inside of fittings or tubing. Apply glue only to the outside of the tubing. This will prevent glue from creating obstructions which could clog your system. Run about 6" (15.24cm) of low-volt wire through the guide hole in the mounting bracket. Split the wire into two strands and strip 1" of insulation from each strand. Wrap the strands in a clockwise direction around the screws on the back of the inlet valve. Tighten the screws. Now attach a weight to the end of the low-voltage wire and drop it down to the basement or crawlspace. Have a length of wire coat hanger ready with one end bent into a hook. Insert the mounting bracket into the wall hole...first down...then up...centering it. Take the hanger and insert the hooked end of the hanger into the 90 degree elbow to hold the bracket in place. Then, slide the inlet valve along the wire hanger into the mounting bracket. Screw the valve into place. Remove the wire hook. Caution: Inlet kits come with a long and a short screw, so be sure to use the short screw in the hole facing the elbow since the long screw could puncture it. Be sure to mount the inlet valve so the lid pulls down to open. Then apply glue to an adequate length of tubing and aim it upward through the hole in the sole plate and into the 90 degree fitting on the back of the mounting bracket. (See Installation Step #6 for information on installing tubing.) Need more space? If you cannot locate a hollow wall, or the space between your walls isn't wide enough, there are two alternatives: One is to run the tubing through a concealed area such as the inside of a closet; then run the tubing downward. Another alternative is to use a floor mounted inlet. Closet wall installation. Often the only practical Fig. 01 solution is to install your system with the tubing going through a wall into a closet, then down through the closet floor. To use this method, select a suitable inlet valve location outside a closet-exercising the same precautions as for normal wall installation. Closet Wall Installation In An Existing Structure Then, using a length of coat hanger, drill a hole through both walls (Fig. 01). Hold the wire perfectly horizontal so the interior and exterior holes line up with one another. Check for inner wall obstructions by bending a short length of coat hanger wire at a right angle and twirl the right angle piece inside the wall. If there are no obstructions, drill a 2-1/4" (5.7cm) hole horizontally through both walls. 6
-
 1
1 -
 2
2 -
 3
3 -
 4
4 -
 5
5 -
 6
6 -
 7
7 -
 8
8 -
 9
9 -
 10
10 -
 11
11 -
 12
12 -
13
-
14
 |
 |
