Electrolux EL7085ADX Installation Instructions (English, Spanish, French) - Page 8
Floor valve installation., Multi-story homes.
 |
View all Electrolux EL7085ADX manuals
Add to My Manuals
Save this manual to your list of manuals |
Page 8 highlights
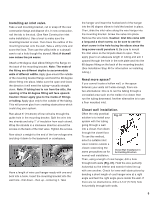
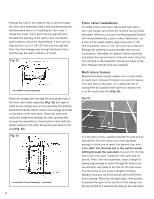
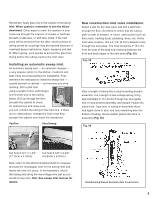
Enlarge the hole in the exterior wall to accommodate the inlet valve assembly (valve and mounting bracket). (As described above in "Installing an inlet valve.") Inside the closet, drill a pilot hole through the floor beneath the opening in the wall or at a convenient spot nearby to check for obstructions. If there are no obstructions, cut a 2-1/4" (5.7cm) hole through the floor. Run low-voltage wire through the hole in floor, and through the wall to exterior of closet. Fig. 02 Inner-Wall Closet Assembly Pass low-voltage wire through the wire guide hole in the inner wall closet assembly (Fig. 02) and tape or cable tie low-voltage wire to this assembly immediately behind the bracket. Attach wires to low-voltage terminals on the back of the inlet valve. Place the inner wall assembly lengthwise through the wall opening and arrange the assembly so the bracket is flush with the inside surface of the wall. Screw the inlet valve to the wall (Fig. 03). Fig. 03 Inner-Wall Closet Assembly - Installed 7 Floor valve installation. To install a floor inlet valve, drill a pilot hole with a wire coat hanger and check the location as previously described. When you are sure that the proposed location will not be blocked by a joist or other obstruction, cut a hole in the carpet slightly larger than your 2-1/4" (5.7cm) drill bit. Drill a 2-1/4" (5.7cm) hole in the floor. Enlarge the opening to accommodate the low-volt connections. Assemble an adapter reducer bushing and attach the low-volt wire to the inlet valve. Drop the low-volt wire to the basement. Screw the valve to the floor. Repeat until all inlets are installed. Multi-story homes. Multi-story homes usually require one or more inlets on each level. Instead of trying to line up inlet valves from one level to the next, run a separate line of tubing from the upstairs inlet valve to a branch line or to the main trunk line (Fig. 04). Fig. 04 In a two-story home, upstairs beneath the site you've selected for the inlet valve cut a hole just large enough to allow you to reach the second-floor sole plate. Hint: Cut the hole low in the wall for easier drilling through the sole plate. Cut a 2-1/4" (5.7cm) hole in the sole plate. Install the inlet valve just as before. Then, from the basement, insert a length of tubing long enough to reach through the hole in the second floor sole plate to the site for the inlet valve. You may have to join several lengths of tubing. Measure and pre-cut these pieces and test-fit them before gluing. When you do apply glue, work quickly to prevent the glue at the top end of the tubing from drying out before it reaches the fitting at the inlet valve.
-
 1
1 -
2
-
 3
3 -
 4
4 -
 5
5 -
 6
6 -
 7
7 -
 8
8 -
 9
9 -
 10
10 -
 11
11 -
 12
12 -
 13
13 -
14
 |
 |
