Electrolux EW30IC60IS Complete Owner's Guide (English) - Page 15
Operating The Cooking Zones Cont'd, Led Messages Or Light Indicators Displayed, By Cooking Zone - appliances
 |
UPC - 057112103846
View all Electrolux EW30IC60IS manuals
Add to My Manuals
Save this manual to your list of manuals |
Page 15 highlights
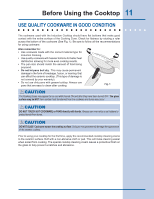
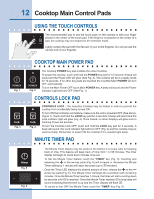
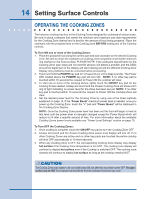
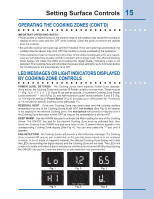
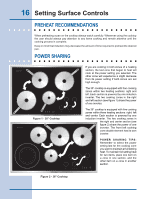
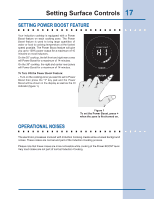
Setting Surface Controls 15 Operating the cooking zones (cont'd) IMPORTANT OPERATING NOTES: • Fluids spilled or objects lying on the controls area of the cooktop may cause the cooktop to display an error code and turn OFF while cooking. Clean the spills or remove the objects from the cooktop. • Be sure the cooktop vent openings are NOT blocked. If the vent openings are blocked, the cooktop internal sensor may shut OFF the cooktop to avoid overheating the appliance. • If the cookware or pan is moved from the center of any active Cooking Zone for any reason, a sensor will detect the situation and the cookware will no longer heat. The affected Cooking Zone display will rotate the LEDs surrounding the digital display indicating a pan is not detected. The Cooking Zone will remember the power level setting for up to 3 minutes before the Cooking Zone will automatically shut OFF. LED Messages or light indicators displayed by cooking zone controls POWER LEVEL SETTINGS - The Cooking Zones have separate Power Level displays. Once active, the Cooking Zones will provide 26 Power Levels to choose from. These include (Fig. 1), 2, 3, 4, 5, 6, 7, 8, 9 and HI; as well as precise .2 increment Cooking Zone Power Levels between and 3 (Fig. 2); and half-increment power levels between 3 and 9.5 (Fig. 3). The highest setting of "Power Boost" (Fig. 4) provides up to 139% power for 10 minutes or 14 minutes for specific cooking zones (see page 17). RESIDUAL HEAT - Once any Cooking Zone has been used and the cooktop surface temperature on any of the Cooking Zones is still HOT, hot surface (See Fig. 5) will appear in the display for the affected Cooking Zone. The hot surface will continue to display even if the Cooking Zone has been turned OFF as long as the temperature is still too HOT. KEEP WARM - Use the WARM key pad to activate the Warm setting for any of the Cooking Zones. The ON/OFF key pad for the desired Cooking Zone must be activated first, then touch the Cooking Zone WARM key pad area once to set. w (warm) should appear in the corresponding Cooking Zone display (See Fig. 6). You can also press the "-" pad until w appears. PAN DETECTION - All Cooking Zones will provide a Pan Detection message. If a Cooking Zone is turned ON and no pan is detected, or the pan has been moved or is not centered correctly, or is not made of magnetic material, the affected Cooking Zone display will rotate the LEDs surrounding the digital display and the Cooking Zone will not heat. The LEDs will continue to rotate until either a pan is detected or until the zone is turned off either by pressing the ON/OFF key pad or 3 minutes after the no pan detection has commenced. Fig. 1 Fig. 4 Fig. 2 Fig. 5 Fig. 3 Fig. 6
-
 1
1 -
2
-
3
-
4
-
5
-
6
-
7
-
8
-
9
-
 10
10 -
 11
11 -
 12
12 -
 13
13 -
 14
14 -
 15
15 -
 16
16 -
 17
17 -
 18
18 -
 19
19 -
 20
20 -
21
-
22
-
23
-
24
 |
 |