Electrolux EW36CC55GB Use and Care Guide - Page 18
Setting Surface - parts
 |
UPC - 057112096780
View all Electrolux EW36CC55GB manuals
Add to My Manuals
Save this manual to your list of manuals |
Page 18 highlights
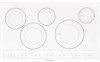
Setting Surface Controls USINGTHETOUCHCONTROL The recommended way to use the touch pads on the cooktop is shown in Fig. 1. Be sure that your finger is placed in the center of the touch pad as shown, If the finger is not placed on the center of a pad, the cooktop may not respond to the selection made, Lightly contact the pad with the flat part of your entire fingertip, Do not just use the narrow end of your fingertip, Fig. i OPERATINGTHE SINGLE SURFACE RADIANT ELEMENT The cooktop has a single radiant surface element at the position shown on Figs, 2 & 3. To Operate the Single Surface Element iiiiiiiiiiiiiiiiiiiiiiiiiiiii iii iiiiiii iii iiiiiii 1ii.i iPiiliaiciie icioirrieiicit!lyiiisized cookware on the radiant surface element, Fig. 2 2. Touch and hold the C) key pad until a beep sounds, The power indicator light POWER above the C) will turn ON. Note: If no other key pad is touched within 20 POWER seconds the request to Power ON the cooktop will clear, 3. Touch and hold the [] pad for the desired element position until a beep is heard, The display will show "0.0". Note: If no further pads are touched within 10 seconds the request to power the element ON will clear, 4. Touch hi + pad once to turn ON the power level to HI or touch = Io pad once for power level to Lo. 5. Each touch of the hi + or = Io pad will increase or decrease the power level, Lo is the lowest power level available, Note: The power level may be adjusted at any time while the element is ON. 6. When cooking has been completed touch the [] pad once to turn the Fig. 3 element OFF and if no other surface element is used touch the C) key pad to turn off POWER the cooktop. Each surface element provides a constant amount of heat at each setting. A glowing red surface heating area extending beyond the bottom edge of the cookware indicates the cookware is too small for the surface heating area, Note: The Hot Element (HE) message will be showed on display for each element until the heating surface area has cooled sufficiently.
-
 1
1 -
2
-
3
-
4
-
5
-
6
-
7
-
8
-
9
-
10
-
11
-
12
-
 13
13 -
 14
14 -
 15
15 -
 16
16 -
 17
17 -
 18
18 -
 19
19 -
 20
20 -
 21
21 -
 22
22 -
 23
23 -
24
-
25
-
26
-
27
-
28
-
29
-
30
-
31
-
32
 |
 |
