Electrolux EW36GC55GS Complete Owner's Guide (English) - Page 9
Placement Of Burner Heads And Caps, Locations Of The Burners - 36 gas cooktop
 |
UPC - 057112097190
View all Electrolux EW36GC55GS manuals
Add to My Manuals
Save this manual to your list of manuals |
Page 9 highlights
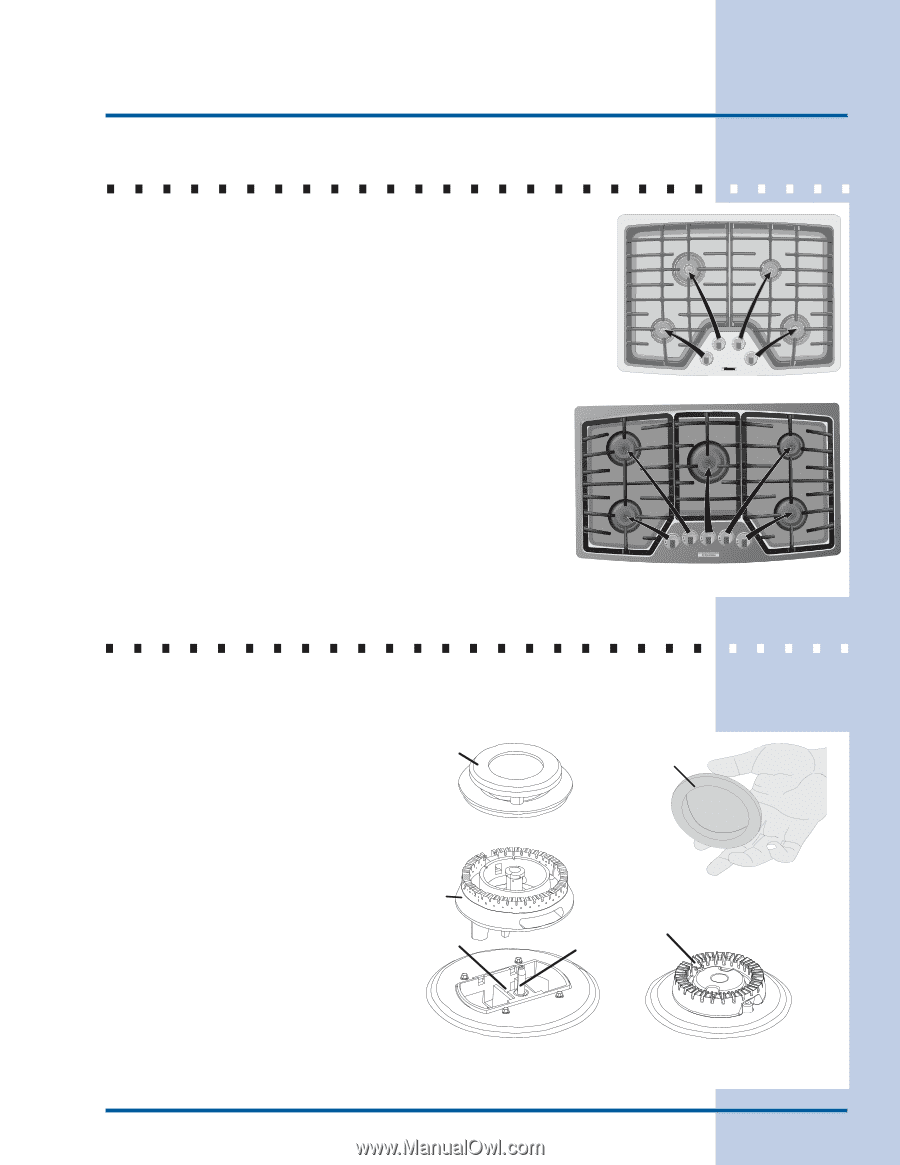
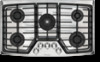
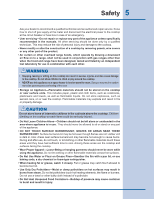
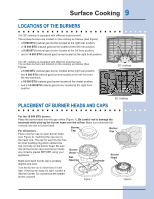
Surface Cooking 9 Locations of the burners The 30" cooktop is equipped with different sized burners. The surface burners are located on the cooktop as follows (See Figure): - a 5 000 BTU (natural gas) burner located at the right rear position; - a 18 000 BTU (natural gas) burner located at the left rear position; - a 9 500 BTU (natural gas) burner located at the left front position; - and a 14 000 BTU (natural gas) burner located at the right front position. The 36" cooktop is equipped with different sized burners. The surface burners are located on the cooktop as follows (See Figure): - a 5 000 BTU (natural gas) burner located at the right rear position; - two 9 500 BTU (natural gas) burners located at the left front and left rear positions; - a 18 000 BTU (natural gas) burner located at the center position; - and a 14 000 BTU (natural gas) burner located at the right front position. OFF OFF OFF OFF 30" cooktop 36" cooktop Placement of burner heads and caps For the 18 000 BTU burner : Place the burner head over the gas orifice (Figure 1). Be careful not to damage the electrode while placing the burner head over the orifice. Make sure electrode fits correctly into slot in burner head. For all burners : Place a burner cap on each burner head Burner Cap Burner Cap (see Figure 2), matching the cap size to the head size. The cap for each burner has an inner locating ring which centers the cap correctly on the burner head. Be sure that all the burner caps and burner heads are correctly placed BEFORE using your appliance. Make sure each burner cap is properly Burner Head Gas Opening Electrode Burner Head aligned and level. Turn the burner on to determine if it will light. If the burner does not light, contact a Service Center. Do not service the sealed burner yourself. Figure 1 Figure 2
-
 1
1 -
2
-
3
-
 4
4 -
 5
5 -
 6
6 -
 7
7 -
 8
8 -
 9
9 -
 10
10 -
 11
11 -
 12
12 -
 13
13 -
 14
14 -
15
-
16
-
17
-
18
-
19
-
20
 |
 |