Emerson LF501EM6F Owner s Manual - Page 8
Stand Assembly, Attaching the Base, Installing the Remote Control Batteries, Insert 2 Batteries AAA
 |
View all Emerson LF501EM6F manuals
Add to My Manuals
Save this manual to your list of manuals |
Page 8 highlights
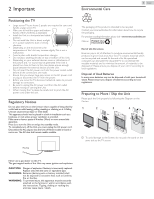
Stand Assembly 8 .English Installing the Remote Control Batteries × 4 Attaching the Base You must attach the base to the Unit to have it as a table top Unit. Be sure the front and rear of the base match the proper direction. For large screen TVs, at least 2 people are required for these steps. 1 1 Slide the battery cover off the back of the Remote Control. 2 Insert 2 Batteries (AAA, 1.5V). Be sure the + and - ends of the Batteries line up with the markings inside the case. 3 Slide the cover back into position. Note(s) ● Remove the Batteries if not using the Remote Control for an extended period of time. 2 × 4 Note(s) ● Make sure to use a table which can support the weight of this Unit and is larger than this Unit. ● Make sure the table is in a stable location. ● When attaching the base, ensure that "FRONT" with "arrow" written on the bottom of the base is downward. If it's not downward, the 2 hooks don't fit into the base. ● When attaching the base, ensure that All Screws are tightly fastened. If the base is not properly attached, it could cause the Unit to fall, resulting in injuries as well as damage to the Unit. ● To remove the base from this Unit, unscrew the Phillips head screws in step 2. Be careful not to drop the base when you remove it. Continued on next page.
-
 1
1 -
2
-
 3
3 -
 4
4 -
 5
5 -
 6
6 -
 7
7 -
 8
8 -
 9
9 -
 10
10 -
 11
11 -
 12
12 -
 13
13 -
14
-
15
-
16
-
17
-
18
-
19
-
20
-
21
-
22
-
23
-
24
-
25
-
26
-
27
-
28
-
29
-
30
-
31
-
32
-
33
-
34
-
35
-
36
-
37
-
38
 |
 |
