Epson 1280 Start Here Card - Page 2
Put On the Paper Put On the Paper Support, Turn On the Turn On the Printer, Install the Ink Install
 |
UPC - 010343844230
View all Epson 1280 manuals
Add to My Manuals
Save this manual to your list of manuals |
Page 2 highlights
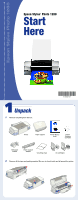
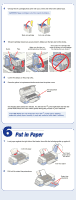
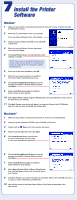
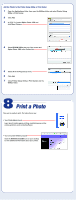
2 Put On the Paper Support Insert the paper support into the slots on the back of the printer. (Don't place it in the paper feeder.) 3 Connect the Printer 1 Shut down your computer before attaching the cable. Leave the computer turned off until instructed to turn it on in section 7. 2 Connect the square end of the USB cable to your printer's USB port. 3 Connect the flat end of the cable to any open USB port on your computer. 4 Turn On the Printer 1 Plug the printer into a grounded electrical outlet. 2 Press the power button to turn on the printer. Don't turn on your computer yet. CAUTION: Always use the power button to turn the printer on or off. Never use an external switch, such as a power strip switch or wall switch. 5 Install the Ink Cartridges 1 Lower the output tray and open the cover. 2 Lift up the two ink cartridge clamps. NOTE: You must install both ink cartridges, or the printer won't work.
-
 1
1 -
 2
2 -
 3
3 -
 4
4 -
 5
5 -
 6
6
 |
 |
