Epson 1280 Start Here Card - Page 3
Put in Put in Paper - color ink
 |
UPC - 010343844230
View all Epson 1280 manuals
Add to My Manuals
Save this manual to your list of manuals |
Page 3 highlights
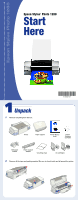
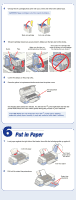
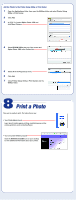
3 Unwrap the ink cartridges that came with your printer and remove the yellow tape. WARNING: Keep cartridges out of the reach of children. Black ink cartridge Color ink cartridge 4 Tilt each cartridge toward you as you lower it. Make sure the tabs rest on the hooks. Hooks Tabs Make sure the tabs are positioned above the hooks Don't place the cartridge tabs under the hooks; you may damage the clamp when you close it 5 Lower the clamps so they snap shut. 6 Press the yellow ink replacement button and close the printer cover. Ink replacement button Ink charging takes about two minutes. You will see the power light flash and hear the printer make noise. Don't turn off the printer during this process or you'll waste ink. CAUTION: Never turn off the printer when the power light is flashing, unless the printer hasn't moved or made any noise for more than 5 minutes. 6 Put in Paper 1 Load paper against the right side of the feeder, then slide the left edge guide up against it. 4 x 6 inch paper 2 Pull out the output tray extensions. Don't load paper above this arrow letter size paper Output tray extensions
-
 1
1 -
 2
2 -
 3
3 -
 4
4 -
 5
5 -
 6
6
 |
 |
