Epson 1520 Product Information Guide - Page 12
ALIGNING THE PRINT HEADS, Using the Print Head Alignment Utility, Using the Control Panel - stylus color service manual
 |
UPC - 010343813328
View all Epson 1520 manuals
Add to My Manuals
Save this manual to your list of manuals |
Page 12 highlights
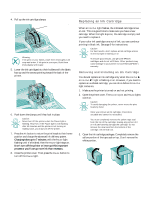
EPSON Stylus COLOR 1520 Aligning the Print Heads If your printouts contain misaligned vertical lines, you may need to align the print heads. There are several ways to do this: t If you're using a Windows or Macintosh computer connected directly to the printer, you can use the Print Head Alignment utility in your printer software. t If you're printing from DOS, you can use the DOS Print Head Alignment utility. t If you're connected to the printer via an optional network interface card or you don't want to use the Print Head Alignment utility, you can use the control panel. Using the Print Head Alignment Utility 1. Turn on the printer and load paper in the built-in sheet feeder, making sure the right edge guide is positioned correctly for your paper's width and the paper release lever is in the single sheet position. Caution: Load paper that's at least 8.3 inches (210 mm) wide so ink doesn't spray onto the platen. 2. Access the Main printer settings dialog box. 3. Click the Utility tab (Windows) or the Utility button (Macintosh). You see the Utility menu. 4. Click the Print Head Alignment icon. 5. Follow the instructions on the screen to print an alignment test page and select the correct alignment. Using the DOS Print Head Alignment Utility Before you can align the print heads, you need to install the DOS alignment utility. Follow these steps: 1. Make sure your computer and printer are turned on. 2. Load several sheets of paper at least 8.3 inches (210 mm) wide in the built-in sheet feeder, making sure the right edge guide is positioned correctly for your paper's width. Also make sure the paper release lever is set to the single sheet position. 3. Insert the EPSON printer software CD-ROM or diskette into a drive. 4. At the DOS prompt, type d:\SETUP (where d is the drive letter of your drive) and press Enter. 5. You see an installation instruction screen. Follow the instructions on the screen to install the utility on your computer's hard disk drive. 6. Once the utility is installed, log onto the directory you specified for the utility. Then type EPCALIB and press Enter to start the program. 7. You see the EPSON Print Head Alignment Utility main screen. Make sure your printer is listed on the screen and select Next. Then follow the instructions on the utility screens to align your print heads. Using the Control Panel 1. Turn on the printer and load several sheets of paper at least 8.3 inches (210 mm) wide in the built-in sheet feeder, making sure the right edge guide is positioned correctly for your paper's width and the paper release lever is in the single sheet position. 2. Turn off your printer. Then hold down the Pause button and turn on the printer to turn on print head alignment mode. The printer loads a sheet of paper and prints an instruction sheet telling you how to select a language (the default setting is English). The printer can then print instructions on aligning the print heads in the language you choose. 3. Press the Alt button until the Ink Out B and Ink Out A lights on the control panel indicate your language. English French Spanish Portuguese German Italian Both lights off Ink Out B on and Ink Out A off Both lights on Ink Out B flashing and Ink Out A on Ink Out B flashing and Ink Out A off Ink Out B off and Ink Out A on 4. Press the Pause button. The printer prints instructions on aligning the print heads using the control panel. 5. Follow the instructions on the sheet. When you're finished, turn off the printer to exit print head alignment mode. 6. After five seconds, turn on the printer to resume printing. Related Documentation TM-STYCLR1520 EPSON Stylus COLOR 1520 Service Manual PL-STYCLR1520 EPSON Stylus COLOR 1520 Parts Price List 4007159 EPSON Stylus COLOR 1520 User's Guide 4007158 EPSON Stylus COLOR 1520 Quick Setup booklet 12 - EPSON Stylus COLOR 1520 5/97
-
 1
1 -
2
-
3
-
4
-
5
-
6
-
 7
7 -
 8
8 -
 9
9 -
 10
10 -
 11
11 -
 12
12
 |
 |
