Epson 1520 Product Information Guide - Page 7
Default Control Panel Settings, Installing An Ink Cartridge For The First Time, Flashing
 |
UPC - 010343813328
View all Epson 1520 manuals
Add to My Manuals
Save this manual to your list of manuals |
Page 7 highlights
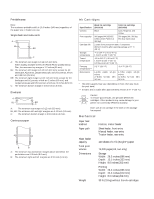
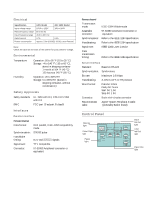
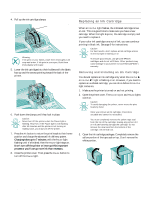
EPSON Stylus COLOR 1520 Default Control Panel Settings You can change the following "default" settings from the printer's control panel: Setting Options Print direction Auto, Bi-D, Uni-D Font Courier, Roman, Sans Serif, Script Prestige, Roman T, Sans Serif H, Draft Pitch 10, 12, 15, 17.1, or 20 cpi, or Proportional I/F (interface) mode Auto, Parallel, Serial, Option Auto I/F (interface) wait time 10 or 30 seconds Software (emulation mode) ESC/P 2, IBM XL24E Auto CR (IBM XL24E mode only) Off, On AGM (IBM XL24E mode only) Off, On Character table PC437 International character set for Italic Italic U.S.A. table Auto line feed Off, On Network I/F (interface) mode Off, On 0 slash 0, 0/ Page length 11, 12, 8.5, or 70/6 inches Skip over perforation Off, On Auto tear off Off, On Banner mode Off, On Parallel I/F (interface) transfer rate Fast, Normal Changing control panel settings Follow these steps to change the settings listed above: 1. Load four or more sheets of paper, at least 8.3 inches (210 mm) wide, into the built-in sheet feeder, making sure the right edge guide is positioned correctly for your paper's width and the paper release lever is set to the single sheet position. 2. Turn off the printer. 3. Hold down the Micro Adjust D button and press the P Operate button to turn on the printer and enter defaultsetting mode. Release the Micro Adjust D button when the Operate light comes on. The printer loads a sheet of paper and prints an instruction sheet telling you how to select a language (the default setting is English). The printer can then print defaultsetting instructions in the language you choose. 4. Press the Alt button until the Ink Out B and Ink Out A lights on your control panel indicate the language you want to use. English French Spanish Portuguese German Italian Both lights off Ink Out B on and Ink Out A off Both lights on Ink Out B flashing and Ink Out A on Ink Out B flashing and Ink Out A off Ink Out B off and Ink Out A on 5. Press the Pause button. The printer prints instructions on changing the default settings. 6. Follow the instructions on the sheets to change the necessary settings, as listed in the next section. Your changes remain in effect until you change them again. (To exit without changing any settings, press the Pause button.) 7. When you're finished changing settings, press Load/Eject if you need to eject any loaded paper. Then turn off the printer to exit default-setting mode. 8. Wait five seconds, then turn on your printer to resume printing normally. Installing an Ink Cartridge for the First Time 1. Press the P Operate button to turn on the printer. The Operate and Ink Out lights come on and the ink cartridge holders move to the installation position. The Pause light begins flashing. 2. Open the printer cover. The Cover Open light comes on. 3. Open the ink cartridge packages. Completely remove the yellow portion of the tape seal on top. Don't remove the white portion. black cartridge color cartridge Caution: You must completely remove the yellow tape seal from the top of the cartridge; leaving any portion of it on will permanently damage the cartridge. Do not remove the clear seal from the bottom of the cartridge; ink will leak out. 5/97 EPSON Stylus COLOR 1520 - 7
-
 1
1 -
 2
2 -
 3
3 -
 4
4 -
 5
5 -
 6
6 -
 7
7 -
 8
8 -
 9
9 -
 10
10 -
 11
11 -
 12
12
 |
 |