Epson 2200 Start Here Card - Page 3
Turn On the Printer
 |
UPC - 010343841840
View all Epson 2200 manuals
Add to My Manuals
Save this manual to your list of manuals |
Page 3 highlights
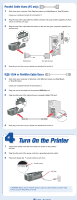
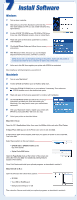
Parallel Cable Users (PC only) 1 Shut down your computer. Click Start and select your Shut Down or Turn Off option. Leave your computer turned off until section 7. 2 Plug the end of the cable with the slotted connector into your printer's parallel port, then secure it with the wire clips. 3 Plug the end of the cable with the screws on the side into your computer's parallel port and secure it. Slotted end End with Screws 4 Now plug in and turn on your printer, as described in section 4. IEEE-1394 or FireWire Cable Users 1 Shut down your computer. In Windows, click Start and select your Shut Down or Turn Off option. Leave your computer turned off until section 7. 2 Plug one end of the cable into the printer's IEEE1394 port. 3 Plug the other end of the cable into your computer's IEEE-1394 port. 4 Now plug in and turn on your printer, as described in section 4. 4 Turn On the Printer 1 Connect the power cord that came with your printer to the printer's AC inlet. 2 Plug the other end of the power cord into a grounded electrical outlet. 3 Press and release the power button to turn it on. Power button AC inlet CAUTION: Never use an external switch, such as a wall switch or power strip switch, to turn the printer on or off.
-
 1
1 -
 2
2 -
 3
3 -
 4
4 -
 5
5 -
 6
6
 |
 |
