Epson 3170 Start Here Card - Page 2
Your First Scan - photo
 |
UPC - 010343846630
View all Epson 3170 manuals
Add to My Manuals
Save this manual to your list of manuals |
Page 2 highlights
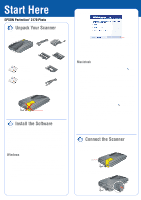
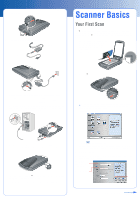
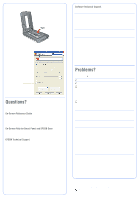
3 Connect the cable for the built-in film adapter. 4 Connect the power cord and AC adapter, as shown. AC adapter Power cord 5 Connect the AC adapter to the scanner. Scanner Basics Your First Scan The ] Start button on your scanner automatically opens the EPSON Smart Panel, making it easy for you to scan your images for many different uses. Here's how you can use the ] Start button and Smart Panel to scan photos and save them as files. 1 Raise the scanner cover and place your photo face down on the glass. Make sure the top right corner of the photo is aligned with the top right corner of the scanner. Then close the cover. 2 Press the ] Start button on your scanner. 6 Plug the other end of the power cord into a grounded electrical outlet. Caution: It is not possible to change the AC adapter's input or output voltage. If the label on the AC adapter does not show the correct voltage, contact your dealer. Do not plug in the power cord. 7 Use the USB cable that came with your scanner. Plug the square end of the USB cable into the scanner's USB port. Then plug the flat end into any available USB port on your computer or hub. Note: In Windows XP, you will see a message the first time you press the ] Start button. Select EPSON Smart Panel, click Always use this program for this action, then click OK. EPSON Smart Panel opens on your computer. Note: Your scanner may not work correctly if you use a USB cable other than the one supplied by EPSON or if you connect your scanner through more than one hub. 8 Turn on the power switch on the side of the scanner. The scanner turns on and the ] Start button flashes green. It stops flashing and stays green when the scanner is ready. 9 For Macintosh, restart your system to fully activate the scanner and software. 3 Click the Scan and Save icon. A progress meter appears on the screen and your photo is automatically scanned. After your photo is scanned, the View Image screen opens. 4 Click Next to continue. 5 When you see the following screen, select a location and file type for your scanned image, then click Save. Specify the path to the folder where you want to save your scanned image Select a file format Click Save Turn over
-
 1
1 -
 2
2 -
 3
3 -
 4
4
 |
 |