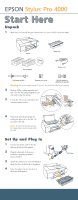
Epson 4000 Start Here Card - Page 2
Install Ink, The printer begins charging the ink delivery system
 |
UPC - 010343848337
View all Epson 4000 manuals
Add to My Manuals
Save this manual to your list of manuals |
Page 2 highlights
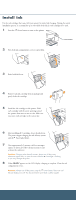
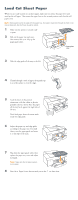
Install Ink Use the ink cartridges that came with your printer for initial ink charging. During the initial installation process, it is normal for up to one-third of the ink in each cartridge to be used. 1 Press the Power button to turn on the printer. Power button 2 Press both ink compartment covers to open them. 3 Raise both ink levers. 4 Remove each ink cartridge from its package and gently shake the cartridge. 5 Install the ink cartridges in the printer. Hold each cartridge with the arrow pointing toward the printer, then insert it into its slot. Make sure you insert each cartridge in the correct slot. 6 After installing all 8 cartridges, lower the ink levers. The printer begins charging the ink delivery system and the Pause light flashes. 7 After approximately 2 minutes, ink lever messages appear on the LCD. follow the instruction to raise or lower the ink levers. Caution: Charging takes about 8 minutes. Never turn off the printer, release the paper lever, or open the cover while the Pause light is flashing, or you may damage the printer. 8 When READY appears on the LCD display, charging is complete. Close the ink compartment covers. Caution: Always turn off the printer using the Power button. Then wait until the LCD display turns off. This ensures that the print head is safely capped.
-
 1
1 -
 2
2 -
 3
3 -
 4
4 -
 5
5 -
 6
6
 |
 |
