Epson 4000 Start Here Card - Page 4
Load Cut Sheet Paper, Adjust the paper tray and edge guide
 |
UPC - 010343848337
View all Epson 4000 manuals
Add to My Manuals
Save this manual to your list of manuals |
Page 4 highlights
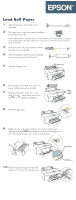
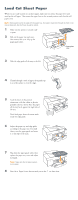
Load Cut Sheet Paper When you are ready to print on cut sheet paper, make sure you release the paper lever and wind up the roll paper. Then return the paper lever to the secured position and close the roll paper cover. Note: Some papers cannot be used with the paper tray. You need to load them through the front or top manual feed slots. See the Printer Guide for details. 1 Make sure the printer is on and ready to print. 2 Pull out the paper tray and cover, then remove the cover. Flip up the paper guide roller. Paper guide roller 3 Slide the edge guide all the way to the left. 4 Thumb through a stack of paper, then gently tap it on a flat surface to even the edges. 5 Load the sheets in the portrait orientation, with the whiter or glossier printable side face down. Place the paper all the way back, against the right side of the tray. Don't load paper above the arrow mark inside the edge guide. 6 Adjust the paper tray and edge guide according to the paper size. For small sheets, raise the paper guide and move it to the edge of the stack. 7 Flip down the paper guide roller, then replace the paper tray cover and adjust its length. Note: Make sure the roll paper support is not raised. 8 Press the Paper Source button until you see the cut sheet icon.
-
 1
1 -
 2
2 -
 3
3 -
 4
4 -
 5
5 -
 6
6
 |
 |
