Epson 4180 Start Here Card - Page 2
Connect the Scanner - scanner software
 |
UPC - 010343850880
View all Epson 4180 manuals
Add to My Manuals
Save this manual to your list of manuals |
Page 2 highlights
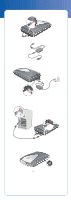
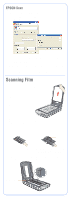
4 At the Software Installation screen, click Install. Click Install 5 Follow the on-screen instructions to install each program, including ABBYY® FineReader® and Presto! BizCard. Note that EPSON Smart Panel™ installs in several steps. 6 At the end of the installation, click Exit. 7 When you see the Product Registration screen, register your scanner as instructed. At the last screen, click Done or close your browser. 8 Remove the CD-ROM, then go to section 3 to connect the scanner to your computer. Macintosh 1 Insert the scanner software CD-ROM in the CD-ROM or DVD drive. The Epson folder opens. If it doesn't open, double-click the Epson CD-ROM icon. 2 Double-click the Epson icon. 3 When you see the message about disabling your antivirus software, click Continue. 4 Read the license agreement, then click Agree. 5 At the Software Installation screen, click Install. Enter your Administrator name and password if necessary. Note: If you're installing on Macintosh OS 9, you may see a prompt to update your Carbon Library. After the CarbonLib installation is complete and you've restarted your system, double-click the Epson icon, then click Install to continue the installation. 6 Follow the on-screen instructions to install each program, including ABBYY FineReader and Presto! BizCard. Click Quit to continue, as needed. Note that EPSON Smart Panel installs in several steps. Do not restart your Macintosh until you have installed all the software. 7 At the end of the installation, click Exit. 8 When you see the Product Registration screen, register your scanner as instructed. At the last screen, click Done or close your browser. 9 Remove the CD-ROM, then follow the instructions below to connect the scanner. Connect the Scanner 1 Remove the sticker from the back of the scanner. Remove sticker 2 Locate the transportation lock on the back of the scanner and slide the lock to the left, as shown below.
-
 1
1 -
 2
2 -
 3
3 -
 4
4 -
 5
5 -
 6
6 -
 7
7 -
 8
8
 |
 |
