Epson 600Q User Setup Information - Page 10
Windows 95 Plug and Play, Turn on the printer first, then your computer. - install
 |
View all Epson 600Q manuals
Add to My Manuals
Save this manual to your list of manuals |
Page 10 highlights
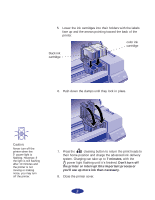
Note: If you're setting up your computer for the first time, you may see a message asking if you want to add a printer. Select Cancel and then complete your Windows 95 setup. You will be prompted to restart Windows to save your new settings. If you then see the New Hardware Found screen, follow the instructions on this page to set up your printer software. If you don't see the screen, follow the instructions under "While Running Windows 95" on page 11. If your computer is on a network and you connected the printer to a remote server, you need to set up the printer for network use after installing the printer software. See Chapter 4 of your User's Guide for instructions. Windows 95 Plug and Play 1. Turn on the printer first, then your computer. 2. If the New Hardware Found screen appears, make sure your printer name is displayed and the Driver from disk provided by hardware manufacturer button is selected. Then click OK. (If you don't see the New Hardware Found screen, skip to "While Running Windows 95" on page 11.) 3. Insert the EPSON printer software CD-ROM (or diskette 1, if you created diskettes) in your drive. 4. Type D:\WINDOWS or A:\ (or the correct drive letter), and click OK. 5. At the next screen, keep or change the printer model name. If you are prompted to use your printer as the Windows default printer, select Yes. 6. Click Finish and then follow the instructions on the screen to install the software. The installer creates an EPSON folder for your printer software icons and adds an icon for your printer to the Printers folder. If you installed your printer software from the CD-ROM, EPSON Answers opens automatically. 10
-
 1
1 -
2
-
3
-
4
-
 5
5 -
 6
6 -
 7
7 -
 8
8 -
 9
9 -
 10
10 -
 11
11 -
 12
12
 |
 |
