Epson 600Q User Setup Information - Page 4
Install The Ink Cartridges
 |
View all Epson 600Q manuals
Add to My Manuals
Save this manual to your list of manuals |
Page 4 highlights
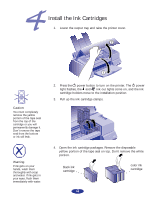
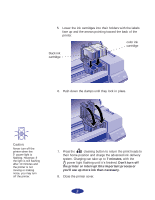
Install the Ink Cartridges 1. Lower the output tray and raise the printer cover. Caution: You must completely remove the yellow portion of the tape seal from the top of the cartridge or you will permanently damage it. Don't remove the tape seal from the bottom or ink will leak. Warning: If ink gets on your hands, wash them thoroughly with soap and water. If ink gets in your eyes, flush them immediately with water. 2. Press the power button to turn on the printer. The power light flashes, the and ink out lights come on, and the ink cartridge holders move to the installation position. 3. Pull up the ink cartridge clamps. 4. Open the ink cartridge packages. Remove the disposable yellow portion of the tape seal on top. Don't remove the white portion. black ink cartridge color ink cartridge ○ ○ ○ 4
-
 1
1 -
 2
2 -
 3
3 -
 4
4 -
 5
5 -
 6
6 -
 7
7 -
 8
8 -
 9
9 -
 10
10 -
11
-
12
 |
 |
