Epson 7700p Product Information Guide - Page 4
Image Size and Projection Distance, screen, the image will be square and you won't have to adjust - powerlite
 |
View all Epson 7700p manuals
Add to My Manuals
Save this manual to your list of manuals |
Page 4 highlights
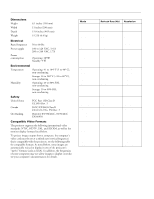
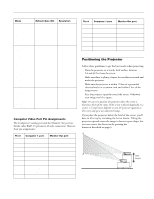
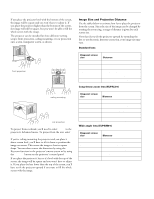
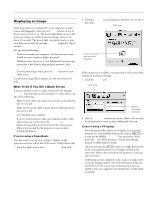
EPSON PowerLite 7700p Projector If you place the projector level with the bottom of the screen, the image will be square and you won't have to adjust it. If you place the projector higher than the bottom of the screen, the image will still be square, but you won't be able to fill the whole screen with the image. The projector can be installed for three different viewing setups: front projection, ceiling mounting, or rear projection onto a semi-transparent screen, as shown: front projection ceiling mounting rear projection To project from overhead, you'll need to select Ceiling in the projector's Advanced menu. To project from the rear, select Rear Proj. If you're ceiling-mounting the projector and you place it above screen level, you'll have to tilt it down to position the image on-screen. This causes the image to lose its square shape. You can then correct the distortion by using the Keystone function in the projector's menu system or by using the Keystone button on the projector's control panel. If you place the projector's lens so it's level with the top of the screen, the image will be square and you won't have to adjust it. If you place the lens lower than the top of the screen, you'll have to tilt the projector upward if you want to fill the whole screen with the image. Image Size and Projection Distance Use the tables below to estimate how far to place the projector from the screen. Since the size of the image can be changed by rotating the zoom ring, a range of distance is given for each screen size. Note that if you tilt the projector upward by extending the feet or use electronic keystone correction, your image size may vary. Standard lens Diagonal screen size 30 inches 60 inches 100 inches 200 inches 300 inches Distance 3.6 - 4.3 feet (1.1 - 1.3 meters) 7.2 - 9.2 feet (2.2 - 2.8 meters) 12.1 - 15.7 feet (3.7 - 4.8 meters) 24.3 - 31.8 feet (7.4 - 9.7 meters) 36.7 - 47.6 feet (11.2 - 14.5 meters) Long throw zoom lens (ELPAL01) Diagonal screen size 30 inches 60 inches 100 inches 200 inches 300 inches Distance 4.46 - 5.87 feet (1.36 - 1.79 meters) 9.35 - 12.2 feet (2.85 - 3.71 meters) 15.8 - 20.5 feet (4.82 - 6.25 meters) 32.1 - 41.5 feet (9.77 - 12.64 meters) 48.3 - 62.4 feet (14.72 - 19.02 meters) Wide angle lens (ELPAW01) Diagonal screen size 30 inches 60 inches 100 inches 200 inches 300 inches Distance 2.8 - 3.6 feet (0.85 - 1.09 meters) 5.5 - 7.2 feet (1.69 - 2.19 meters) 9.3 - 12.0 feet (2.82 - 3.66 meters) 18.6 - 24.0 feet (5.67 - 7.33 meters) 28.1 - 36.1 feet (8.57 - 11.00 meters) 4 - EPSON PowerLite 7700p Projector 11/00
-
 1
1 -
 2
2 -
 3
3 -
 4
4 -
 5
5 -
 6
6 -
 7
7 -
 8
8 -
 9
9 -
 10
10 -
11
 |
 |
