Epson BrightLink Solo Interactive Module IU-01 Quick Setup Guide - Page 16
Launch the Easy Interactive Driver., For best performance, hold the pen at an angle like a normal pen
 |
View all Epson BrightLink Solo Interactive Module IU-01 manuals
Add to My Manuals
Save this manual to your list of manuals |
Page 16 highlights
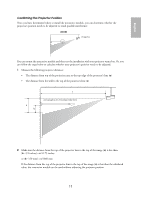
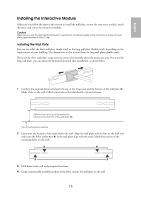
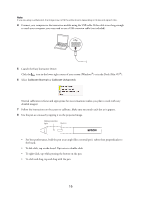
Note If you are using a whiteboard, the image may not fill the entire board, depending on its size and aspect ratio. 4 Connect your computer to the interactive module using the USB cable. If the cable is not long enough to reach your computer, you may need to use a USB extension cable (not included). 5 Launch the Easy Interactive Driver. Click the icon in the lower right corner of your screen (Windows®) or in the Dock (Mac OS®). 6 Select Calibrate (Normal) or Calibrate (Advanced). Normal calibration is faster and appropriate for most situations (unless you plan to work with very detailed images). 7 Follow the instructions on the screen to calibrate. Make sure you touch each dot as it appears. 8 Use the pen as a mouse by tapping it on the projected image. Battery indicator light Button • For best performance, hold the pen at an angle (like a normal pen), rather than perpendicular to the board. • To left-click, tap on the board. Tap twice to double-click. • To right-click, tap while pressing the button on the pen. • To click and drag, tap and drag with the pen. 16
-
 1
1 -
2
-
3
-
4
-
5
-
6
-
7
-
8
-
9
-
10
-
 11
11 -
 12
12 -
 13
13 -
 14
14 -
 15
15 -
 16
16 -
 17
17 -
 18
18 -
 19
19 -
 20
20 -
 21
21 -
22
-
23
-
24
-
25
-
26
-
27
-
28
-
29
-
30
-
31
-
32
-
33
-
34
-
35
-
36
-
37
-
38
-
39
-
40
 |
 |
