Epson C11C546011-N Start Here Card - Page 7
Mac OS X, Mac OS 9.x or Earlier, Install Printer Driver and Utilities
 |
UPC - 010343849976
View all Epson C11C546011-N manuals
Add to My Manuals
Save this manual to your list of manuals |
Page 7 highlights
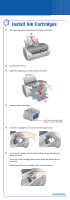
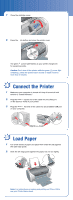
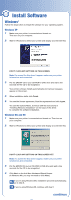
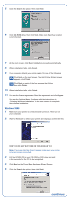
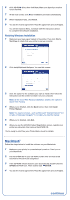
5 You see the Install Menu. Click Install Printer Driver and Utilities. In Mac® OS X, enter your administrator password and click OK. 6 Follow the instructions on the screen to install the software and restart your Macintosh. 7 After your Macintosh restarts, double-click the SPR200 CD-ROM icon (if necessary). Then double-click EPSON. 8 Click Install Optional Software. 9 Click the option for the software you want to install, then follow the instructions on the screen to install it on your Macintosh. 10 When you're finished, click the Back button, then click Install Printer Manual. Note: You need a browser-such as Microsoft Internet Explorer 4.0 or later, Netscape Navigator 4.0 or later, or Safari™ 1.0 or later-to view the manual. 11 When you're finished, click Exit to close the Install Menu. 12 When you see the EPSON Product Registration screen, register your printer as instructed, then remove the EPSON CD. Go to the section below for your OS to finish setting up your printer. Mac OS X 1 Open the Applications folder on your hard drive, then open the Utilities folder and select Print Center. 2 Select Stylus Photo R200 in the Printer List window, then click the Add icon. Note: If you don't see your printer in the Printer List, make sure the printer is turned on and connected. 3 Select EPSON USB from the pull-down list, click Stylus Photo R200, then select All from the Page Setup drop-down list. 4 Click Add. You see the printer list with the Stylus Photo R200 and Stylus Photo R200(Sheet Feeder - Borderless) printer options. 5 Close the Print Center. You're ready to print! See your Printer Basics book for details. Note: To print from Macintosh Classic applications in OS X, restart your Macintosh in OS 9 and follow the steps under the "Macintosh" section (to the left) to install your printer software. Mac OS 9.x or Earlier 1 Open the Apple® menu and select Chooser. 2 Click the SP R200 Series icon, click your USB port, and turn on background printing. 3 Close the Chooser. You're ready to print! See your Printer Basics book for details.
-
 1
1 -
 2
2 -
 3
3 -
 4
4 -
 5
5 -
 6
6 -
 7
7 -
 8
8
 |
 |
