Epson CX4200 Product Information Guide
Epson CX4200 - Stylus Color Inkjet Manual
 |
UPC - 010343855120
View all Epson CX4200 manuals
Add to My Manuals
Save this manual to your list of manuals |
Epson CX4200 manual content summary:
- Epson CX4200 | Product Information Guide - Page 1
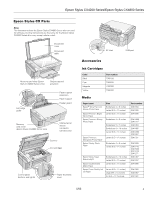
Epson Stylus CX4800 Series all-in-one and its software, but the instructions are the same for the Epson Stylus CX4200 Series all-in-one, except where noted. Document cover Document table Memory card slots (Epson Stylus CX4800 Series only) Output tray and extension Left edge guide Paper support - Epson CX4200 | Product Information Guide - Page 2
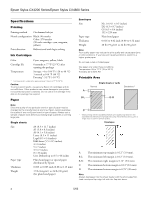
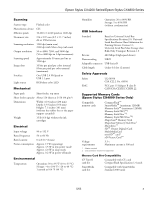
Epson Stylus CX4200 Series/Epson Stylus CX4800 Series Specifications Printing Printing method On-demand ink jet Nozzle configuration Black: 90 nozzles Color: 270 nozzles (90 each cartridge: cyan, magenta, yellow) Print direction Bidirectional with logic seeking Ink Cartridges Color Cyan, - Epson CX4200 | Product Information Guide - Page 3
Epson Stylus CX4200 Series/Epson Stylus CX4800 Series Scanning Scanner type Photoelectric device Effective pixels Document size Scanning resolution Output resolution Scanning speed Image data Interface Light source Flatbed color CIS 10,200 × 14,040 pixels at 1200 dpi 216 × 297 mm (8.5 × 11.7 - Epson CX4200 | Product Information Guide - Page 4
Epson Stylus CX4200 Series/Epson Stylus CX4800 Series Memory Stick/ MemoryStick PRO card slot even for landscape printing. Make sure the paper lies beneath the tabs and the arrow mark on the left edge guide. Letter-size paper Loading Paper Single Sheets 1. Open the paper support and output tray, - Epson CX4200 | Product Information Guide - Page 5
the best results, you'll want to use one of Epson's special ink jet papers designed for your printer. For example, your photos will look great printed on Premium Glossy Photo Paper. See "Media" on page 1 for more information. 5. Slide the left edge guide against the left edge of the paper (but not - Epson CX4200 | Product Information Guide - Page 6
Epson Stylus CX4200 Series/Epson Stylus CX4800 Series 3. Slide the left edge guide to the left. 4. Load up to 10 envelopes at a time, flap edge left, printable side up, against the right edge guide. Load the flap edge left, printable side up Note: For best results, press each envelope flat before - Epson CX4200 | Product Information Guide - Page 7
Epson Stylus CX4200 Series/Epson Stylus CX4800 Series Placing Originals for Copying or Scanning Caution: Do not place heavy objects on the document table glass and do not press the glass with too much force. 1. Open the document cover - Epson CX4200 | Product Information Guide - Page 8
Epson Stylus CX4200 Series/Epson Stylus CX4800 Series 4. Press the Copy button until you see the desired number of copies in the Copy window. on page 7. Be sure to close the document cover. 3. Press the Copy button until you see "-" in the Copy window. This tells the Epson Stylus CX to print up - Epson CX4200 | Product Information Guide - Page 9
Epson Stylus CX4200 Series/Epson Stylus CX4800 Series Printing From a Memory Card (Epson Stylus CX4800 Series Only) Inserting the Card 1. Make sure the Epson Stylus CX4800 Series all-in-one is turned on. Note: When you print directly from a memory card, it is best if the Epson Stylus CX4800 Series - Epson CX4200 | Product Information Guide - Page 10
Epson Stylus CX4200 Series/Epson Stylus CX4800 Series For multiple index sheets, the pages containing the most recent images are printed first. If you want to cancel printing more sheets, press the y Stop button. Now follow the instructions below to select photos and print. Selecting Photos on the - Epson CX4200 | Product Information Guide - Page 11
your photos as explained in your camera manual. Note: If your camera is not supported, a flashing P appears in the Copy window, and the b Error light flashes. (On the Epson Stylus CX4800 Series, the Print All/DPOF/PictBridge light also flashes.) Epson cannot guarantee the compatibility of any camera - Epson CX4200 | Product Information Guide - Page 12
faded, or badly exposed photo into one with true-to-life color and sharpness as you scan. 1. Place your original photo on the scanner as described on page 7. 2. Start EPSON Scan. See page 11 for instructions: 3. When the EPSON Scan window appears, do one of the following, depending on the currently - Epson CX4200 | Product Information Guide - Page 13
. Tip: If you do not use your Epson Stylus CX often, it is a good idea to print a few pages at least once a month to maintain good print quality. Replacing Ink Cartridges ❏ When the red B ink light flashes, one or more ink cartridges are low on ink. ❏ When the red B ink light stays on, you need to - Epson CX4200 | Product Information Guide - Page 14
open the scanner when the document cover is open. 3. Press and release the B ink button. The P On and B ink lights flash. Note: Do not hold down the B ink button for more than 3 seconds or the printer will start to clean the print head. If one of the cartridges is low or empty, the Epson Stylus CX - Epson CX4200 | Product Information Guide - Page 15
Epson Stylus CX4200 Series/Epson Stylus CX4800 Series Caution: Do not move the print head by hand; this may damage the Epson Stylus CX. Always press the B ink button to move it. 4. Press the B ink button again. ❏ If more than one cartridge is empty or low, the next cartridge moves to the _ ink out - Epson CX4200 | Product Information Guide - Page 16
Epson Stylus CX4200 Series/Epson Stylus CX4800 Series 11. Close the scanner. 3. Windows: Right-click the printer icon on your taskbar (in the lower right corner of your screen). Select Print Head Alignment. Macintosh OS X: Open the Applications folder and select EPSON Print Utility. Select your - Epson CX4200 | Product Information Guide - Page 17
paper support. 3. Unplug the power cord from the electrical outlet. Then disconnect the USB cable from the Epson Stylus CX. 4. Open the scanner section and make sure the ink cartridge holder is in the home position on the right. Caution: Be sure to remove the tape after installing the printer in
-
 1
1 -
 2
2 -
 3
3 -
 4
4 -
 5
5 -
 6
6 -
 7
7 -
8
-
9
-
10
-
11
-
12
-
13
-
14
-
15
-
16
-
17
 |
 |
Epson Stylus CX4200 Series/Epson Stylus CX4800 Series
5/05
1
Epson Stylus CX Parts
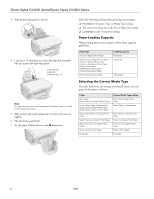
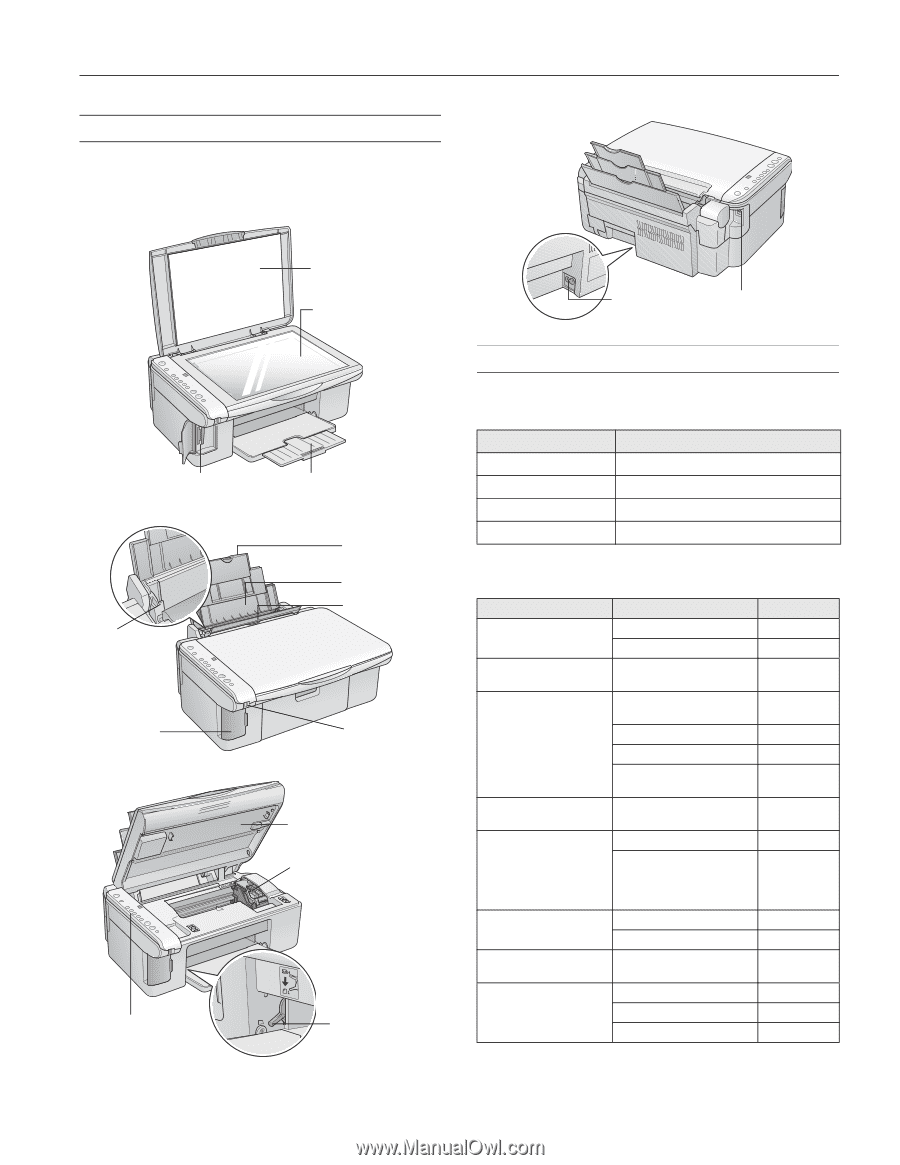
Accessories
Ink Cartridges
Media
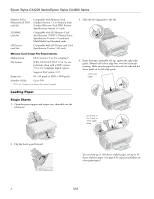
Paper support
extension
Feeder guard
Left edge
guide
Paper support
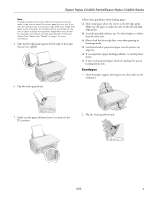
Memory
card cover
(Epson Stylus CX4800 Series only)
USB external
device
connector
(camera only)
Document
cover
Document
table
Memory card slots (Epson
Stylus CX4800 Series only)
Output tray and
extension
Control panel
(buttons and lights)
Paper thickness
lever
Ink cartridges
Scanner
Note:
The illustrations show the Epson Stylus CX4800 Series all-in-one and
its software, but the instructions are the same for the Epson Stylus
CX4200 Series all-in-one, except where noted.
Color
Part number
Black
T060120
Cyan
T060220
Magenta
T060320
Yellow
T060420
Paper name
Size
Part number
Epson
®
Ultra Premium
Glossy Photo Paper
Borderless 4 × 6 inches
S041934
Letter (8.5 × 11 inches)
S041935
Epson Premium Bright
White Paper
Letter (8.5 × 11 inches)
S041586
Epson Premium Glossy
Photo Paper
Borderless 4 × 6 inches
S041808/
S041727
Borderless 5 × 7 inches
S041464
Borderless 8 × 10 inches
S041465
Letter (8.5 × 11 inches)
S041286/
S041667
Epson Premium
Semigloss Photo Paper
Letter (8.5 × 11 inches)
S041331
Epson Glossy Photo
Paper
Borderless 4 × 6 inches
S041809
Letter (8.5 × 11 inches)
S041141/
S041649/
S041272/
S041271
Epson Matte Paper
Heavyweight
Borderless 8 × 10 inches
S041467
Letter (8.5 × 11 inches)
S041257
Epson Double-Sided
Matte Paper
Letter (8.5 × 11 inches)
S041568
Epson Photo Quality Ink
Jet Paper
Letter (8.5 x 11 inches)
S041062
Legal (8.5 x 14 inches)
S041067
A4 (8.3 x 11.7 inches)
S041061
USB port
AC inlet