Epson CX7000F Product Information Guide - Page 17
Aligning the Print Head - stylus scanner error
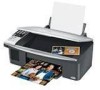 |
UPC - 010343861244
View all Epson CX7000F manuals
Add to My Manuals
Save this manual to your list of manuals |
Page 17 highlights
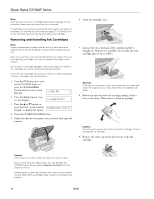
Caution: If you do not remove the yellow tape before installing the ink cartridge, print quality may decline or you may not be able to print. Do not remove any other seals from the cartridges. . Epson Stylus CX7000F Series 14. Press the x Start Color/OK button. The CX7000F Series begins charging ink and Charging appears on the display. Start Color OK 10. Place the new ink cartridge into the cartridge holder and push it down until it clicks into place. 11. Replace any other cartridges that need to be replaced. 12. Close the ink cartridge cover and press it until it clicks into place. Charging takes about one minute. When it's finished, 5.Replace Cartridge appears on the display. Caution: Never turn off the CX7000F Series while Charging appears on the display or you'll waste ink. Note: If you see an ink cartridge error message on the display, the ink cartridge may not be installed correctly. Press the x Start Color/ OK button and reinstall the ink cartridge until it clicks into place. 15. Press the y Cancel/Back button until you return to the screen displaying the date. Caution: If you replaced a cartridge while copying a photo or document, cancel printing and make sure your original is still placed correctly on the document table. Then copy your original again. 13. Close the scanner. Aligning the Print Head If your printouts look grainy or blurry, or you see light or dark horizontal banding, you may need to align the print head. Note: Banding may also occur if your cartridges are low on ink or you need to clean the print head. 1. Turn on the CX7000F Series. 2. Load several sheets of paper. 3. Windows: Right-click the printer icon on your taskbar (in the lower right corner of your screen). Select Print Head Alignment. Macintosh OS X: Open the Applications folder and select EPSON Print Utility. Select your CX7000F Series in the printer list, click OK, and select Print Head Alignment. 10/06 17
-
 1
1 -
2
-
3
-
4
-
5
-
6
-
7
-
8
-
9
-
10
-
11
-
 12
12 -
 13
13 -
 14
14 -
 15
15 -
 16
16 -
 17
17 -
 18
18 -
 19
19
 |
 |
