Epson CX7000F Product Information Guide - Page 18
Transporting the CX7000F Series, to close the Print Head Alignment Utility. - stylus printer
 |
UPC - 010343861244
View all Epson CX7000F manuals
Add to My Manuals
Save this manual to your list of manuals |
Page 18 highlights
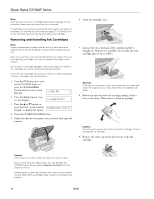
Epson Stylus CX7000F Series 4. Follow the instructions on the screen to print a vertical alignment sheet. You see a window like this one: 8. Click Print to print a color horizontal alignment sheet. After it's printed, you see a window like this one: 5. Look at the five sets of patterns in your printout. For each set, if you see a pattern with no visible vertical lines, enter its number in the corresponding box on the screen and click Next. If you can't find an aligned pattern, choose the one that's closest to being aligned. Click Realignment and then Print to print another alignment sheet and repeat this step. 6. Click Print to print a black horizontal alignment sheet. After it's printed, you see a window like this one: 7. Look at the printout and select the pattern with no gap or line between the rectangles. Enter the number for that pattern in the box on the screen and click Next. If you can't find an aligned pattern, choose the one that looks the best. Then click Realignment to print another alignment sheet and repeat this step. 9. Look at the printout and find the pattern with no gap or line between the rectangles and enter its number in the box on the screen. 10. If you can't find an aligned pattern, choose the one that looks the best. Then click Realignment to print another alignment sheet and repeat this step. 11. Click Finish to close the Print Head Alignment Utility. Transporting the CX7000F Series If you need to ship your CX7000F Series, you must prepare it for transportation by packing it in its original box or one of a similar size. 1. Turn off the CX7000F Series. 2. Remove any paper from the sheet feeder and close the paper support. 3. Unplug the power cord from the electrical outlet. Then disconnect the USB cable from the CX7000F Series. 4. Open the scanner section and make sure the ink cartridge holder is in the home position on the right. 5. Secure the ink cartridge holder (print head) to the case with tape. Caution: Before you turn on the CX7000F Series, be sure to remove the tape after installing the printer in its new location. 18 10/06
-
 1
1 -
2
-
3
-
4
-
5
-
6
-
7
-
8
-
9
-
10
-
11
-
12
-
 13
13 -
 14
14 -
 15
15 -
 16
16 -
 17
17 -
 18
18 -
 19
19
 |
 |
