Epson CX9475Fax Start Here Book (with wireless print server) - Page 12
Installing Software and Connecting the Print Server, Insert the CX9475Fax software installation CD. - stylus drivers
 |
UPC - 010343867918
View all Epson CX9475Fax manuals
Add to My Manuals
Save this manual to your list of manuals |
Page 12 highlights
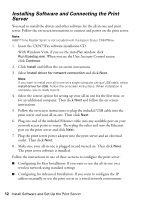
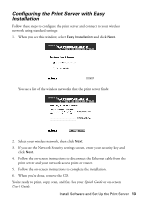
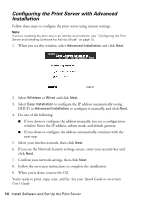
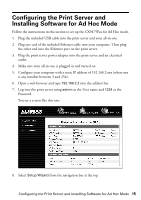
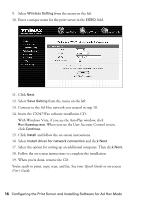
Installing Software and Connecting the Print Server You need to install the drivers and other software for the all-in-one and print server. Follow the on-screen instructions to connect and power on the print server. Note: ABBY® Fine Reader Sprint is not included with the Epson Stylus CX9475Fax. 1. Insert the CX9475Fax software installation CD. With Windows Vista, if you see the AutoPlay window, click Run Epsetup.exe. When you see the User Account Control screen, click Continue. 2. Click Install and follow the on-screen instructions. 3. Select Install driver for network connection and click Next. Note: If you want to install your all-in-one on a single computer using a USB cable, select Install driver for USB. Follow the on-screen instructions. When installation is complete, you're ready to print. 4. Select the correct option for setting up your all-in-one for the first time, or for an additional computer. Then click Next and follow the on-screen instructions. 5. Follow the on-screen instructions to plug the included USB cable into the print server and your all-in-one. Then click Next. 6. Plug one end of the included Ethernet cable into any available port on your network access point or router. Then plug the other end into the Ethernet port on the print server and click Next. 7. Plug the print server power adapter into the print server and an electrical outlet. Then click Next. 8. Make sure your all-in-one is plugged in and turned on. Then click Next. The print server software is installed. Follow the instructions in one of these sections to configure the print server: ■ Configuring for Easy Installation: If you want to use the all-in-one on a wireless network using standard settings ■ Configuring for Advanced Installation: If you want to configure the IP address manually or use the print server in a wired network environment 12 Install Software and Set Up the Print Server
-
 1
1 -
2
-
3
-
4
-
5
-
6
-
 7
7 -
 8
8 -
 9
9 -
 10
10 -
 11
11 -
 12
12 -
 13
13 -
 14
14 -
 15
15 -
 16
16 -
 17
17 -
18
-
19
-
20
-
21
-
22
-
23
-
24
 |
 |
