Epson ELPDC11 User's Guide - Page 10
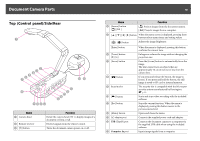
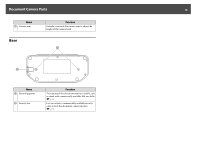
Document Camera Parts, Top (Control panel)/Side/Rear
 |
View all Epson ELPDC11 manuals
Add to My Manuals
Save this manual to your list of manuals |
Page 10 highlights
Document Camera Parts Top (Control panel)/Side/Rear Name A Camera head B Remote receiver C [t] button Function Rotate the camera head ±90˚ to display images of a document or from a wall. Receives signals from the remote control. Turns the document camera power on or off. 10 Name Function D [Source] button [ ][ ] [ ] Projects images from the document camera. [ ] Projects images from a computer. E button When the menu screen is displayed, pressing these buttons selects menu items and setting values. [ ] [ ] button Adjusts the image Brightness. [Enter] button F [Zoom] button [z] [x] G [Focus] button H [ ] button I Security slot J [ ] button K [Esc] button L [Menu] button M AC adapter port N USB (TypeB) port O Computer In port When the menu is displayed, pressing this button confirms the current item. Enlarges or reduces the image without changing the projection size. Press the [Focus] button to automatically focus the image. The unit cannot focus on objects that are approximately 10 cm (4 inches) or less from the camera lens. If you press and release the button, the image is frozen. If you press and hold the button, the still image is saved to SD card or internal memory. The security slot is compatible with the Microsaver security system manufactured by Kensington. s p.16 Starts and stops video recording with the included software. Stops the current function. When the menu is displayed, pressing this button moves to the previous menu level. Opens and closes the menu. Connects the supplied power cord and adapter. Connects the document camera to a computer via the supplied USB cable when using the included software. Inputs image signals from a computer.
-
 1
1 -
2
-
3
-
4
-
 5
5 -
 6
6 -
 7
7 -
 8
8 -
 9
9 -
 10
10 -
 11
11 -
 12
12 -
 13
13 -
 14
14 -
 15
15 -
16
-
17
-
18
-
19
-
20
-
21
-
22
-
23
-
24
-
25
-
26
-
27
-
28
-
29
-
30
-
31
-
32
-
33
-
34
-
35
-
36
-
37
-
38
-
39
-
40
-
41
-
42
-
43
-
44
-
45
-
46
-
47
-
48
-
49
-
50
-
51
-
52
-
53
-
54
-
55
-
56
-
57
-
58
-
59
-
60
-
61
-
62
-
63
-
64
-
65
 |
 |
