Epson ELPDC11 User's Guide - Page 43
Making Time-lapse Movies
 |
View all Epson ELPDC11 manuals
Add to My Manuals
Save this manual to your list of manuals |
Page 43 highlights
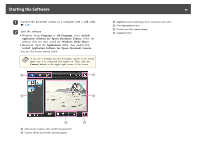
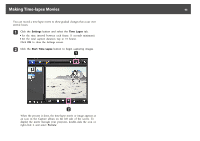
Making Time-lapse Movies 43 You can record a time-lapse movie to show gradual changes that occur over several hours. a Click the Settings button and select the Time Lapse tab. • Set the time interval between each frame (5 seconds minimum). • Set the total capture duration (up to 72 hours). Click OK to close the Settings screen. b Click the Start Time Lapse button to begin capturing images. When the process is done, the time-lapse movie or image appears as an icon in the Capture album on the left side of the screen. To display the movie through your projector, double-click the icon or right-click it and select Preview.
-
 1
1 -
2
-
3
-
4
-
5
-
6
-
7
-
8
-
9
-
10
-
11
-
12
-
13
-
14
-
15
-
16
-
17
-
18
-
19
-
20
-
21
-
22
-
23
-
24
-
25
-
26
-
27
-
28
-
29
-
30
-
31
-
32
-
33
-
34
-
35
-
36
-
37
-
 38
38 -
 39
39 -
 40
40 -
 41
41 -
 42
42 -
 43
43 -
 44
44 -
 45
45 -
 46
46 -
 47
47 -
 48
48 -
49
-
50
-
51
-
52
-
53
-
54
-
55
-
56
-
57
-
58
-
59
-
60
-
61
-
62
-
63
-
64
-
65
 |
 |

You can record a time-lapse movie to show gradual changes that occur over
several hours.
a
Click the
Settings
button and select the
Time Lapse
tab.
•
Set the time interval between each frame (5 seconds minimum).
•
Set the total capture duration (up to 72 hours).
Click
OK
to close the Settings screen.
b
Click the
Start Time Lapse
button to begin capturing images.
When the process is done, the time-lapse movie or image appears as
an icon in the Capture album on the left side of the screen. To
display the movie through your projector, double-click the icon or
right-click it and select
Preview
.
Making Time-lapse Movies
43