Epson ES-400 Users Guide - Page 48
Using WPS to Set Up a Direct Wi-Fi Connection, Wi-Fi Protected Setup (WPS) - scanner buttons
 |
View all Epson ES-400 manuals
Add to My Manuals
Save this manual to your list of manuals |
Page 48 highlights
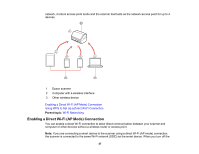
scanner, the smart device is automatically connected to other Wi-Fi networks, so you must reconnect to the scanner in AP mode from the smart device when you turn the scanner back on. To avoid reconnecting every time you turn the scanner off and back on, connect the scanner to an access point instead. Before you begin, note the SSID and password shown on the label on the back of the scanner. 1. Press the Wi-Fi on/off button on the scanner's control panel. 2. From your computer or device, search for and select the SSID shown on the label on the back of the scanner. 3. Enter the password shown on the label on the back of the scanner. The AP mode light is lit blue when an AP mode connection is established. Parent topic: Direct Wi-Fi Mode Setup Using WPS to Set Up a Direct Wi-Fi Connection You can use Wi-Fi Protected Setup (WPS) to create a direct Wi-Fi connection to a WPS-enabled computer or device. 1. Press and hold the Wi-Fi connect button on the scanner for at least 3 seconds, then release it when the Wi-Fi on/off light flashes blue. The scanner enters standby mode for WPS connection for two minutes. 2. Press the WPS button on your computer or device, or enable the WPS feature. When the Wi-Fi on/off light on the scanner stays on, the connection is established. Parent topic: Direct Wi-Fi Mode Setup Wi-Fi Protected Setup (WPS) If your network uses a WPS-enabled wireless router or access point, you can quickly connect your scanner to the network using Wi-Fi Protected Setup (WPS). Note: To check if your router is WPS-enabled, look for a button labeled WPS on your router or access point. If there is no hardware button, there may be a virtual WPS button in the software for the device. Check your network product documentation for details. Using WPS to Connect to a Network Using WPS PIN Mode to Connect to a Network 48
-
 1
1 -
2
-
3
-
4
-
5
-
6
-
7
-
8
-
9
-
10
-
11
-
12
-
13
-
14
-
15
-
16
-
17
-
18
-
19
-
20
-
21
-
22
-
23
-
24
-
25
-
26
-
27
-
28
-
29
-
30
-
31
-
32
-
33
-
34
-
35
-
36
-
37
-
38
-
39
-
40
-
41
-
42
-
 43
43 -
 44
44 -
 45
45 -
 46
46 -
 47
47 -
 48
48 -
 49
49 -
 50
50 -
 51
51 -
 52
52 -
 53
53 -
54
-
55
-
56
-
57
-
58
-
59
-
60
-
61
-
62
-
63
-
64
-
65
-
66
-
67
-
68
-
69
-
70
-
71
-
72
-
73
-
74
-
75
-
76
-
77
-
78
-
79
-
80
-
81
-
82
-
83
-
84
-
85
-
86
-
87
-
88
-
89
-
90
-
91
-
92
-
93
-
94
-
95
-
96
-
97
-
98
-
99
-
100
-
101
-
102
-
103
-
104
-
105
-
106
-
107
-
108
-
109
-
110
-
111
-
112
-
113
-
114
-
115
-
116
-
117
-
118
-
119
-
120
-
121
-
122
-
123
-
124
-
125
-
126
-
127
-
128
-
129
-
130
-
131
-
132
-
133
-
134
-
135
-
136
-
137
-
138
-
139
-
140
-
141
-
142
-
143
-
144
-
145
-
146
-
147
-
148
-
149
-
150
-
151
 |
 |
