Epson LQ-2550 User Manual - Page 25
Running the Self Test, The printer is turned off.
 |
View all Epson LQ-2550 manuals
Add to My Manuals
Save this manual to your list of manuals |
Page 25 highlights
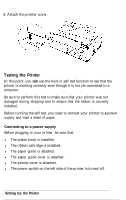
To plug in your printer, simply connect the power cable to the AC inlet on the printer's rear panel. Then plug the power cable into a properly grounded electrical outlet. Running the self test The self test can be run in draft mode or Letter Quality mode, depending on which button you hold down as you turn on the printer. With the color ribbon cartridge installed, the self test prints in seven colors (black, magenta, cyan, violet, yellow, red, and green). Before running the self test, be sure that: l The power cable is connected to a properly grounded electrical outlet. l The printer is turned off. Note: Run the self test using paper that is at least as wide as standard letter-size paper (8% inches). 1-16 Setting Up the Printer
-
 1
1 -
2
-
3
-
4
-
5
-
6
-
7
-
8
-
9
-
10
-
11
-
12
-
13
-
14
-
15
-
16
-
17
-
18
-
19
-
 20
20 -
 21
21 -
 22
22 -
 23
23 -
 24
24 -
 25
25 -
 26
26 -
 27
27 -
 28
28 -
 29
29 -
 30
30 -
31
-
32
-
33
-
34
-
35
-
36
-
37
-
38
-
39
-
40
-
41
-
42
-
43
-
44
-
45
-
46
-
47
-
48
-
49
-
50
-
51
-
52
-
53
-
54
-
55
-
56
-
57
-
58
-
59
-
60
-
61
-
62
-
63
-
64
-
65
-
66
-
67
-
68
-
69
-
70
-
71
-
72
-
73
-
74
-
75
-
76
-
77
-
78
-
79
-
80
-
81
-
82
-
83
-
84
-
85
-
86
-
87
-
88
-
89
-
90
-
91
-
92
-
93
-
94
-
95
-
96
-
97
-
98
-
99
-
100
-
101
-
102
-
103
-
104
-
105
-
106
-
107
-
108
-
109
-
110
-
111
-
112
-
113
-
114
-
115
-
116
-
117
-
118
-
119
-
120
-
121
-
122
-
123
-
124
-
125
-
126
-
127
-
128
-
129
-
130
-
131
-
132
-
133
-
134
-
135
-
136
-
137
-
138
-
139
-
140
-
141
-
142
-
143
-
144
-
145
-
146
-
147
-
148
-
149
-
150
-
151
-
152
-
153
-
154
-
155
-
156
-
157
-
158
-
159
-
160
-
161
-
162
-
163
-
164
-
165
-
166
-
167
-
168
-
169
-
170
-
171
-
172
-
173
-
174
-
175
-
176
-
177
-
178
-
179
-
180
-
181
-
182
-
183
-
184
-
185
-
186
-
187
-
188
-
189
-
190
-
191
-
192
-
193
-
194
-
195
-
196
-
197
-
198
-
199
-
200
-
201
-
202
-
203
-
204
-
205
-
206
-
207
-
208
-
209
-
210
-
211
-
212
-
213
-
214
-
215
-
216
-
217
-
218
-
219
-
220
-
221
-
222
-
223
-
224
-
225
-
226
-
227
-
228
-
229
-
230
-
231
-
232
-
233
-
234
-
235
-
236
-
237
-
238
-
239
-
240
-
241
-
242
-
243
-
244
-
245
-
246
-
247
-
248
-
249
-
250
-
251
-
252
-
253
-
254
-
255
-
256
-
257
-
258
-
259
-
260
-
261
-
262
-
263
-
264
-
265
-
266
-
267
-
268
-
269
-
270
-
271
-
272
-
273
-
274
-
275
-
276
-
277
-
278
-
279
-
280
-
281
 |
 |

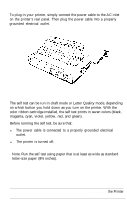
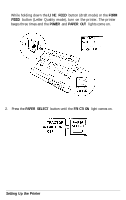
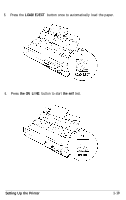
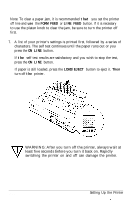
To plug in your printer, simply connect the power cable to the AC inlet
on the printer’s rear panel. Then plug the power cable into a properly
grounded electrical outlet.
Running the self test
The self test can be run in draft mode or Letter Quality mode, depending
on which button you hold down as you turn on the printer. With the
color ribbon cartridge installed, the self test prints in seven colors (black,
magenta, cyan, violet, yellow, red, and green).
Before running the self test, be sure that:
l
The power cable is connected to a properly grounded electrical
outlet.
l
The printer is turned off.
Note: Run the self test using paper that is at least as wide as standard
letter-size paper (8% inches).
1-16
Setting Up
the Printer