Epson NX115 Start Here - Page 6
Macintosh - printer software
 |
UPC - 010343872486
View all Epson NX115 manuals
Add to My Manuals
Save this manual to your list of manuals |
Page 6 highlights
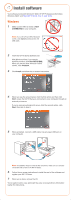
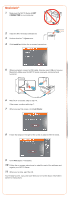
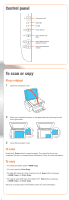
Macintosh® 1 Make sure the NX110 Series is NOT CONNECTED to your computer. 2 Insert the NX110 Series Software CD. 3 Double-click the Epson icon. 4 Click Install and follow the on-screen instructions. 5 When prompted, connect a USB cable. Use any open USB port on your Macintosh. Make sure the NX110 Series is securely connected and turned on. 6 Mac OS X 10.5 users: skip to step 10. Other users: continue with step 7. 7 When you see this screen, click Add Printer. 8 Follow the steps on the right of the screen to add the NX110 Series. 9 Click Next again, if necessary. 10 Follow the on-screen instructions to install the rest of the software and register your NX110 Series. 11 When you're done, eject the CD. You're ready to print, copy, and scan! See your on-screen Epson Information Center for instructions.
-
 1
1 -
 2
2 -
 3
3 -
 4
4 -
 5
5 -
 6
6 -
 7
7 -
 8
8
 |
 |