Epson Perfection 4490 Photo Product Information Guide - Page 8
Removing Dust and Scratch Marks From Film or Slides, Reading the Scanner Light, Transporting - software
 |
View all Epson Perfection 4490 Photo manuals
Add to My Manuals
Save this manual to your list of manuals |
Page 8 highlights
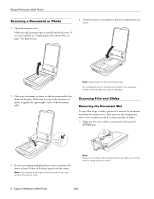
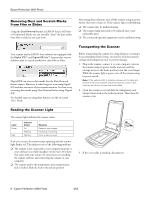
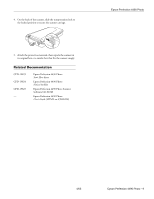
Epson Perfection 4490 Photo Removing Dust and Scratch Marks From Film or Slides Using the Dust Removal feature in EPSON Scan's Full Auto or Professional Mode, you can virtually "clean" the dust marks from film or slides as you scan them. After trying these solutions, turn off the scanner using its power switch, then turn it back on. If the scanner light is still flashing: ❏ The scanner may be malfunctioning. ❏ The scanner lamp may need to be replaced (not a user- replaceable part). ❏ The connected optional equipment may be malfunctioning. Your scanner and its EPSON Scan software are equipped with the Digital ICE™ and Digital ICE Lite™ features that remove stubborn dust or scratch marks from color film or slides. Digital ICE can remove dust marks that the Dust Removal feature cannot. However, it takes longer to scan using Digital ICE and also uses more of your system resources. It is best to try removing dust marks using Dust Removal before using Digital ICE. For detailed steps on using these features, see the on-screen User's Guide. Transporting the Scanner Before transporting the scanner for a long distance or storing it for an extended period of time, you need to lock the scanner's carriage and transparency unit to prevent damage. 1. Plug in the scanner, connect it to your computer, turn on the scanner using its power switch, and wait until the carriage moves to the home position (near the cover hinge). While the scanner light is green, turn off the scanner using its power switch. Note: If the optional ADF is installed, disconnect its cable and remove it from the scanner. Place the scanner cover on the scanner, but do not connect the cover cable. 2. Open the scanner cover and slide the transparency unit transportation lock to the locked position. Then close the scanner cover. Reading the Scanner Light The scanner light indicates the scanner status. Color Green Red Indicator Status On Flashing Flashing Meaning Ready to scan images. Initializing or scanning. An error has occurred. If an error occurs, the scanner stops operating and the scanner light flashes red. This indicates one of the following problems: ❏ The scanner is not connected to your computer properly or your software is not fully installed. See the Start Here sheet that came with your scanner for instructions on installing the scanner software and connecting the scanner to your computer. ❏ The scanner and/or the transparency unit transportation lock is locked. Slide the lock to the unlock position. 3. If the cover cable is attached, disconnect it. 8 - Epson Perfection 4490 Photo 4/05
-
 1
1 -
2
-
 3
3 -
 4
4 -
 5
5 -
 6
6 -
 7
7 -
 8
8 -
 9
9 -
 10
10
 |
 |