Epson PhotoPC 3100Z Product Information Guide - Page 10
Using the Camera SETUP Menu, Taking Pictures with the LCD Screen - manual
 |
View all Epson PhotoPC 3100Z manuals
Add to My Manuals
Save this manual to your list of manuals |
Page 10 highlights
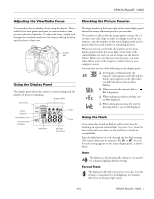
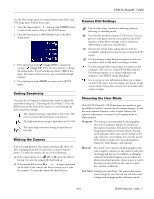
EPSON PhotoPC 3100Z Follow these steps to choose the user mode: 1. Turn the dial to and press the POWER button to turn on the camera. You see the SETUP menu: user mode This example shows how the LCD screen looks in Program user mode. The screen looks different for Manual or Full Auto mode. 2. Press the button next to the current user mode to cycle through the three modes. Using the Camera SETUP Menu You can use the Camera SETUP menu to turn the confirmation screen on or off, set the automatic power off feature, adjust the brightness of the LCD screen, set the alert sounds, and adjust the volume. To go to the Camera SETUP menu, turn the camera dial to to go to the Setup menu. Then press the button under Camera SETUP. automatic power off time set LCD brightness set alert sounds set the volume Taking Pictures with the LCD Screen Once you've made any changes to the user mode and Camera SETUP menus, you're ready to take pictures with the LCD screen. NOTE If the LCD screen is idle for more than the designated power-off time, the camera shuts down automatically. To turn it back on, press the shutter button. Follow these steps to take your picture: 1. Make sure you are at least 20 inches (50 cm) away from your subject. (To get closer, use Macro mode.) 2. Turn the camera dial to to see a live preview with the View menu settings. 3. Make any changes you want to the settings on the View menu. You can also use the camera's control buttons to make changes to image quality, flash, or other basic settings. (See page 9 for descriptions of basic camera settings.) 4. Push the T (telephoto) button to zoom in on your subject, or the W (wide angle) button to zoom out. You see a display with green zoom steps and the current zoom position in yellow. 5. Center your subject on the screen, then press the shutter button halfway down to lock the auto focus and exposure. The photo capture light stops flashing and you see a green circle on the screen when the lens locks in focus and the camera locks its exposure settings. While holding the shutter button down, you can reframe your picture if you want. photo capture light microphone 6. Press the shutter button the rest of the way down to take the picture. 10 - EPSON PhotoPC 3100Z 4/01
-
 1
1 -
2
-
3
-
4
-
 5
5 -
 6
6 -
 7
7 -
 8
8 -
 9
9 -
 10
10 -
 11
11 -
 12
12 -
 13
13
 |
 |
