Epson PhotoPC 3100Z Product Information Guide - Page 9
Setting Sensitivity, Waking the Camera, Camera Dial Settings, Choosing the User Mode - instruction manual
 |
View all Epson PhotoPC 3100Z manuals
Add to My Manuals
Save this manual to your list of manuals |
Page 9 highlights
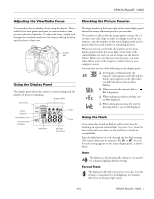
EPSON PhotoPC 3100Z Use the Shot Setup menu to switch between these JPEG and Tiff image types. Follow these steps: 1. Turn the camera dial to and press the POWER button to turn on the camera. You see the SETUP menu. 2. Press the button next to Shot Setup to go to the Shot Setup menu. 3. Press the button under Image JPEG to change the setting to Image Tiff. (Press the same button to change the setting back.) If your card has less than 9.1MB of free space, the camera instructs you to use a card with enough memory. 4. Press the button under BACK to return to the SETUP menu. Setting Sensitivity You must be in Program or Manual user mode to adjust the sensitivity setting (see "Choosing the User Mode"). Press the ISO button on the back of the camera to cycle through the three sensitivity settings: The standard setting is equivalent to ISO 100. This is the recommended setting for most photos. The high sensitivity setting is equivalent to ISO 200. The super high sensitivity setting is equivalent to ISO 400. Waking the Camera If you're using batteries, the camera automatically shuts off after a designated period of inactivity to conserve battery power. To wake the camera, do one of the following: ❏ If the camera dial is set to , , or , press the shutter button. Or, turn the camera off, then back on. ❏ If the camera dial is set to , , or , press any button on the back of the camera (the shutter button won't wake the camera). Or, turn the camera off, then back on. Camera Dial Settings Use for video clips, continuous shooting, interval shooting, or stitching mode. Lets you take pictures using the LCD screen. You can preview your photos on the screen and use the LCD menus to adjust photo settings, such as sensitivity, white balance, exposure, and aperture. Choose this setting when taking photos with the viewfinder, which uses less battery power than the LCD screen. Use this setting to play back your photos so that you can delete them or add audio recordings to them. Use this setting when connecting your camera to the computer. Also use it to create DPOF files with the PrintMark program, or to adjust brightness and sharpness with PRINT Image Matching™ . Use to set up or view information about your camera on the LCD screen. You can change user mode, set the camera clock, format the memory card, and make other camera settings. Choosing the User Mode The EPSON PhotoPC 3100Z has three user modes to give you different levels of control over the camera settings. To use the more advanced features, such as white balance and exposure adjustment, you must be in Program mode or Manual mode. Program This setting is recommended for photographers who want a moderate amount of control over the camera's functions. This mode is the default. Programmed subjects (Normal, Sports, Portrait, and Landscape) tailor your camera settings to the type of picture you're taking. You can also use the LCD menus to make your own adjustments to sensitivity, white balance, and exposure. Manual This mode is for experienced photographers who want complete control over the camera's wide array of settings and features. In addition to changing sensitivity and white balance, you can adjust the shutter speed and aperture, choose a spot or matrix metering system, and focus the camera to three feet, ten feet, or fifty feet. Full Auto Simply point and shoot. The camera determines most settings for you, but you can still select basic settings such as image quality and macro mode. 4/01 EPSON PhotoPC 3100Z - 9
-
 1
1 -
2
-
3
-
 4
4 -
 5
5 -
 6
6 -
 7
7 -
 8
8 -
 9
9 -
 10
10 -
 11
11 -
 12
12 -
 13
13
 |
 |
