Epson PhotoPC 750Z User Manual - Image Authentication Software - Page 6
Installing IAS, Uploading IAS to Your Camera, EPSON Image Authentication System only - serial cable
 |
View all Epson PhotoPC 750Z manuals
Add to My Manuals
Save this manual to your list of manuals |
Page 6 highlights
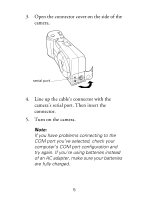
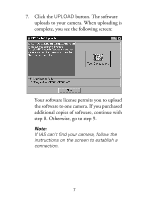
Installing IAS Follow these steps to install IAS: 1. Insert the EPSON Image Authentication System CD into your CD-ROM drive. 2. Click the Start button, then click Run. 3. Type D:\SETUP (where D is the letter of the CD-ROM drive) and click OK to start the installation program. 4. Follow the instructions on your screen. Uploading IAS to Your Camera EPSON Image Authentication System only verifies the authenticity of pictures taken after the IAS program is uploaded to your camera. You can use this procedure both to upload IAS to your camera and to verify that IAS is loaded on a camera. Before you start, make sure you have the serial cable that came with your camera. Also, either use an AC adapter or make sure your camera has a fully charged set of batteries. 3
-
 1
1 -
 2
2 -
 3
3 -
 4
4 -
 5
5 -
 6
6 -
 7
7 -
 8
8 -
 9
9 -
 10
10 -
 11
11 -
 12
12 -
13
-
14
-
15
-
16
-
17
-
18
-
19
-
20
-
21
-
22
 |
 |
