Epson PictureMate Dash Basics - Page 38
Installing Software for Macintosh, User's Guide
 |
UPC - 683728127114
View all Epson PictureMate Dash manuals
Add to My Manuals
Save this manual to your list of manuals |
Page 38 highlights
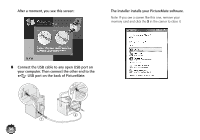
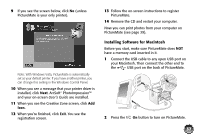
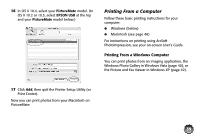
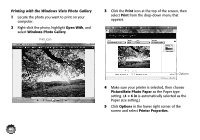
9 If you see the screen below, click No (unless PictureMate is your only printer). Note: With Windows Vista, PictureMate is automatically set as your default printer. If you have another printer, you can change this setting in the Windows Control Panel. 10 When you see a message that your printer driver is installed, click Next. ArcSoft® PhotoImpression™ and your on-screen User's Guide are installed. 11 When you see the Creative Zone screen, click Add Icon. 12 When you're finished, click Exit. You see the registration screen. 13 Follow the on-screen instructions to register PictureMate. 14 Remove the CD and restart your computer. Now you can print photos from your computer on PictureMate (see page 39). Installing Software for Macintosh Before you start, make sure PictureMate does NOT have a memory card inserted in it. 1 Connect the USB cable to any open USB port on your Macintosh. Then connect the other end to the USB port on the back of PictureMate. 2 Press the On button to turn on PictureMate. 37
-
 1
1 -
2
-
3
-
4
-
5
-
6
-
7
-
8
-
9
-
10
-
11
-
12
-
13
-
14
-
15
-
16
-
17
-
18
-
19
-
20
-
21
-
22
-
23
-
24
-
25
-
26
-
27
-
28
-
29
-
30
-
31
-
32
-
 33
33 -
 34
34 -
 35
35 -
 36
36 -
 37
37 -
 38
38 -
 39
39 -
 40
40 -
 41
41 -
 42
42 -
 43
43 -
44
-
45
-
46
-
47
-
48
-
49
-
50
-
51
-
52
-
53
-
54
-
55
-
56
-
57
-
58
-
59
-
60
-
61
-
62
-
63
-
64
-
65
-
66
-
67
-
68
-
69
-
70
-
71
-
72
-
73
-
74
-
75
-
76
-
77
-
78
-
79
-
80
-
81
-
82
-
83
-
84
-
85
-
86
-
87
-
88
-
89
-
90
-
91
 |
 |
