Epson PowerLite 4770W User Manual - Page 45
Installing Batteries in the Remote Control, Setting Up the Projector
 |
View all Epson PowerLite 4770W manuals
Add to My Manuals
Save this manual to your list of manuals |
Page 45 highlights
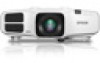
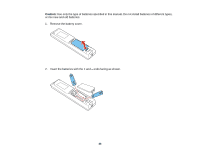
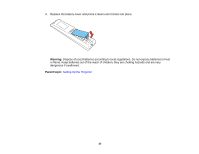
2. Insert the end of the cable clip anchor into the cable clip slot near the HDMI port. 1 Cable clip slot 2 Cable clip anchor 3 Cable clip 3. Place the open cable clip around the HDMI cable, but don't lock it into place. 4. Slide the cable clip onto the anchor and lock the clip onto the HDMI connector. To remove the cable clip, open the clip and disconnect the HDMI cable. Then pinch the sides of the cable clip anchor and carefully pull it out of the cable clip slot. Parent topic: Setting Up the Projector Related tasks Connecting to a Computer for HDMI Video and Audio Connecting to an HDMI Video Source Installing Batteries in the Remote Control The remote control uses the two AA batteries that came with the projector. 45
-
 1
1 -
2
-
3
-
4
-
5
-
6
-
7
-
8
-
9
-
10
-
11
-
12
-
13
-
14
-
15
-
16
-
17
-
18
-
19
-
20
-
21
-
22
-
23
-
24
-
25
-
26
-
27
-
28
-
29
-
30
-
31
-
32
-
33
-
34
-
35
-
36
-
37
-
38
-
39
-
 40
40 -
 41
41 -
 42
42 -
 43
43 -
 44
44 -
 45
45 -
 46
46 -
 47
47 -
 48
48 -
 49
49 -
 50
50 -
51
-
52
-
53
-
54
-
55
-
56
-
57
-
58
-
59
-
60
-
61
-
62
-
63
-
64
-
65
-
66
-
67
-
68
-
69
-
70
-
71
-
72
-
73
-
74
-
75
-
76
-
77
-
78
-
79
-
80
-
81
-
82
-
83
-
84
-
85
-
86
-
87
-
88
-
89
-
90
-
91
-
92
-
93
-
94
-
95
-
96
-
97
-
98
-
99
-
100
-
101
-
102
-
103
-
104
-
105
-
106
-
107
-
108
-
109
-
110
-
111
-
112
-
113
-
114
-
115
-
116
-
117
-
118
-
119
-
120
-
121
-
122
-
123
-
124
-
125
-
126
-
127
-
128
-
129
-
130
-
131
-
132
-
133
-
134
-
135
-
136
-
137
-
138
-
139
-
140
-
141
-
142
-
143
-
144
-
145
-
146
-
147
-
148
-
149
-
150
-
151
-
152
-
153
-
154
-
155
-
156
-
157
-
158
-
159
-
160
-
161
-
162
-
163
-
164
-
165
-
166
-
167
-
168
-
169
-
170
-
171
-
172
-
173
-
174
-
175
-
176
-
177
-
178
-
179
-
180
-
181
-
182
-
183
-
184
-
185
-
186
-
187
-
188
-
189
-
190
-
191
-
192
-
193
-
194
-
195
-
196
-
197
-
198
-
199
-
200
-
201
-
202
-
203
-
204
-
205
-
206
-
207
-
208
-
209
-
210
-
211
-
212
-
213
-
214
-
215
-
216
-
217
-
218
-
219
-
220
-
221
-
222
-
223
-
224
-
225
-
226
-
227
-
228
-
229
-
230
-
231
-
232
-
233
-
234
-
235
-
236
-
237
-
238
-
239
-
240
 |
 |

2.
Insert the end of the cable clip anchor into the cable clip slot near the
HDMI
port.
1
Cable clip slot
2
Cable clip anchor
3
Cable clip
3.
Place the open cable clip around the HDMI cable, but don't lock it into place.
4.
Slide the cable clip onto the anchor and lock the clip onto the HDMI connector.
To remove the cable clip, open the clip and disconnect the HDMI cable. Then pinch the sides of the
cable clip anchor and carefully pull it out of the cable clip slot.
Parent topic:
Setting Up the Projector
Related tasks
Connecting to a Computer for HDMI Video and Audio
Connecting to an HDMI Video Source
Installing Batteries in the Remote Control
The remote control uses the two AA batteries that came with the projector.
45